The Windows recycle bin usually receives little attention. However, correct handling is just as important for securely removing sensitive data as it is for restoring accidentally deleted content.
Such a long guide to the Windows recycle bin? Yes, because the Windows tool offers much more than just collecting data that is no longer needed. The term “collect” was chosen deliberately because it describes the function of the recycle bin much better than “delete.”
As with the real recycle bin at home, what you throw in it is not gone. Rather, the waste bin must be emptied so that it does not overflow and the discarded contents actually disappear.
Both also apply to Windows: The space in the recycle bin is limited and “deleted” files can be restored without much effort. It therefore does not offer protection for confidential content.
The recycle bin does not delete the data it contains
This should also be emphasized again because Microsoft always refers to the Windows function as “Delete” — but it should correctly be called “Move to Recycle Bin.”
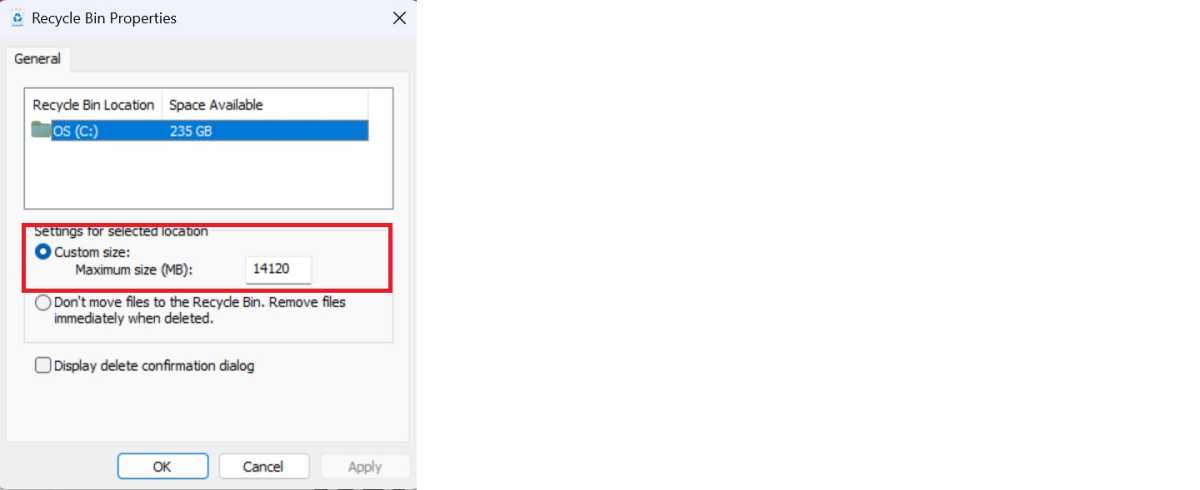
Even the option “Delete files immediately (do not move to recycle bin)” cannot hide this fact. This is because the data itself is not really gone or deleted. This recycle bin setting at least ensures that hard drive space is actually freed up for saving other data when “deleting.” At the same time, this overwriting makes it more difficult to reconstruct the deleted elements.
The additional option “Show dialogue to confirm deletion dialogue,” on the other hand, only skips the confirmation prompt, so the “deleted” data is still there, occupies storage space, and can be easily restored.
Tip: You can prevent this by using Secure Eraser to overwrite files and free storage space several times after emptying the recycle bin.