There are two areas that often cause printer trouble: Windows and high consumption costs. In both cases you can achieve a great effect with targeted tricks that help the printer run optimally.
The printer always goes on strike when you need a printout very quickly. You probably first focus on the hardware to troubleshoot. But often your printer or multifunctional device is not responsible for the problem. Rather, the last Windows update turns out to be the cause.
It can destroy the printer driver, change the basic settings of the Office software, or add driver versions to the system without your active intervention, which then lead to unforeseeable printing problems.
Apart from Windows, consumption costs are a perennial issue with printers — at least if you have an output device that is supplied with cartridge ink or standard toner cartridges. But here, too, there are solutions with which you can noticeably reduce the follow-up costs right down to the paper. You do not need any additional software or a specific printer model. A little tuning is all it takes.
With the following tricks, the system will no longer interfere with your printing. At the same time, you are in control of how much of the ink goes on how many sheets.
Solve printer problems after Windows updates
No matter whether Windows 10 or 11, updates to the operating system often result in printer problems. Suddenly, an email can only be printed with gaps. Or the printer disappears from the home network for some unknown reason. Or vice versa: The device appears with several entries in the Windows control panel.
Adjust the print format in Outlook
Especially with Microsoft Outlook, Windows updates often have a negative effect. A common printer error is missing text blocks when you print out a long email. The text parts are usually lost at page changes, although they are visible in the print preview.
This is how to proceed: To get the entire mail message on paper, you must redefine the print format. To do this, double-click on the mail in Outlook that you want to print. In the window that opens, go to File > Print. Click on Print options under the standard printer. Outlook uses the Memo Style for printing emails. You can see it under Print format. To check the memo style defaults, click on Page Setup.
In the next window, select the Paper tab. A4 should be selected under both Type and Size. After Windows updates, other formats may be here — such as Letter or A3. Since they do not fit your standard printer, they cause misprints with omitted areas in mails. Finally, check under Orientation whether portrait format is set up. If not, change the setting accordingly and confirm your entries with OK.
Advantage: The print settings you have made now apply not only to the selected mail but to all Outlook mails — at least until the next Windows update interferes again.

Undo an update that paralyzes printer
Suddenly you can no longer control your WLAN printer. When you send a print job, it simply goes nowhere.
This is how to proceed: In most cases, the last Windows update turns out to be the cause when the network printer is no longer accessible. The first step is to verify this suspicion by searching for the last update in the Settings app of Windows 10 or 11 and clarify the situation by searching the internet.
You can find the installed updates for Windows 10 under Update & Security > Windows Update > View update history. For Windows 11, go directly to Windows Update > Update History. Note the update identifier, which begins with the letters “KB” and is followed by a sequence of numbers. After that, search Google fpr “printer problem Windows Update.”
If it is confirmed that the system update is causing printer problems, uninstall the update. You can do this directly in the Update history under Uninstall updates. Make sure you select the correct Windows update — again, the update identifier is decisive.
Trending for you

After a restart, the network printer should be accessible again. For a test, go to Devices > Printers and scanners in the settings for Windows 10, select your printer and click on Manage. Print a test printout via Print test page. On a Windows 11 system, navigate to your printer via Bluetooth and devices > Printers and scanners.
Microsoft often provides an update shortly after an update that has caused printer problems. You can install it even if you have deleted the previous update. This is even recommended for security reasons.
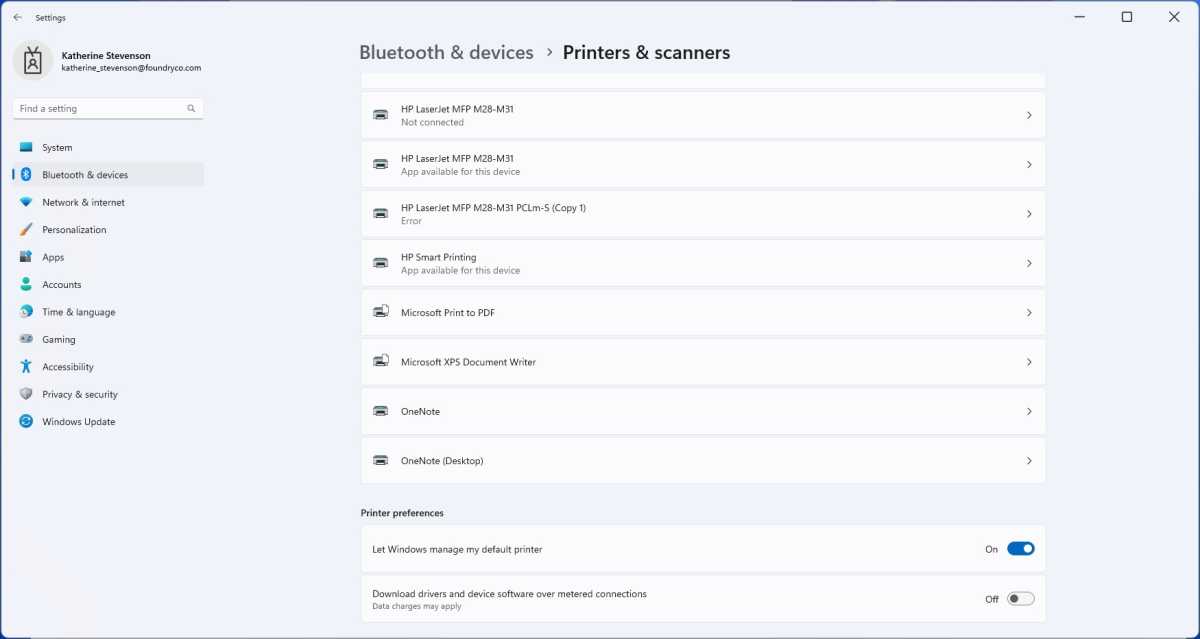
Address multiple printer entries in Windows
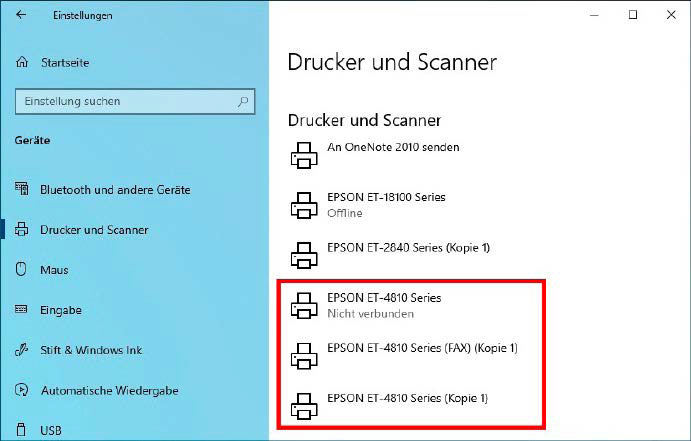
All of a sudden your printer or multifunctional device appears twice or even more in the Windows operating system. The duplicates can be caused by an operating system update, among other things. They make it difficult to choose the right driver.
This is how you proceed: To delete multiple printer entries, go to Devices > Printers and scanners in the Settings app for Windows 10, and to Bluetooth and devices > Printers and scanners for Windows 11.
Duplicate printer entries usually consist of the printer name — for example “Epson ET-2840” — with or without an addition. It either describes another function of your device — for example “FAX” for the PC fax function. Or it indicates that the driver has been installed several times. Then you will see the description “USB” for the USB port or “(Copy 1)” next to the printer name. Only the latter is actually a duplicate entry.
Before deleting it, use the printer driver to check that it is not the network driver. If this is not the case, click on it and delete the entry via Remove device in Windows 10 or simply Remove in Windows 11.
Epson
To avoid future confusion, set the desired driver as the default. To do this, click on the relevant entry in Windows 10, select Manage and then Set as default. With Windows 11, you may first have to get the system out of the habit of managing the default printer. To do this, scroll down in the window and deactivate the checkbox Windows manages the default printer.
Then click on the entry and on Set as default. In both cases, this driver will now take effect when you trigger the print command in an application.
If you’re not sure which driver variant you should define as the default printer, print a test page on each of the entries in question. As a rule, only one device driver works correctly. Select this one.
Save ink, toner, and paper
Printing always costs money, because ink or toner as well as paper themselves cost money. Naturally, you want to keep these as low as possible. This also has the positive side effect of being less wasteful.
Save by using print preview
The print command is quickly given, but the result is not at all what you imagined. The result: The printouts are for the waste paper basket and have to be repeated. You can avoid expensive misprints simply by using the print preview.
This is how you proceed: Especially with longer texts and extensive tables, it is worthwhile to use the print preview, even if it means an intermediate step until the finished printout. Check the margins of the document and correct them so that as much content as possible fits on as few pages as possible. With tables, it is worth checking the columns. For example, Excel often automatically moves wide columns to the next page. You quickly waste sheets of paper here.
When printing photos, it is also worth taking a look at the print preview. It shows whether the photo is centered if you want to print it with margins. The preview can also save you from annoying misprints on expensive photo paper. You will see immediately if the picture is incorrectly aligned — i.e. in portrait instead of landscape format or vice versa.
Save with grayscale
Most printer models use all colors in the basic settings and, if in doubt, use them even if a printout should only contain grayscales. This lowers the ink and toner levels of blue, red, and yellow, even though you actually only want to use black. You can switch off this effect on some printers, and at least reduce it on others, thus actively reducing ink/toner consumption.
This is how you proceed: If you want to use only the black cartridge for a printout, several steps are usually necessary before printing. First, set the “grayscale” mode in the printer driver.
As the setting is usually not to be used generally, but only for a specific document, you do this from within the program — usually under File > Print.
In the new window, look for Properties to open the printer driver. Here you often select the option “grayscale” directly in the main settings. Search the driver for further options for monochrome printing. Some printers also offer the option of printing only with the black cartridge under Extras or Further options. Confirm the entries with OK.
Foundry
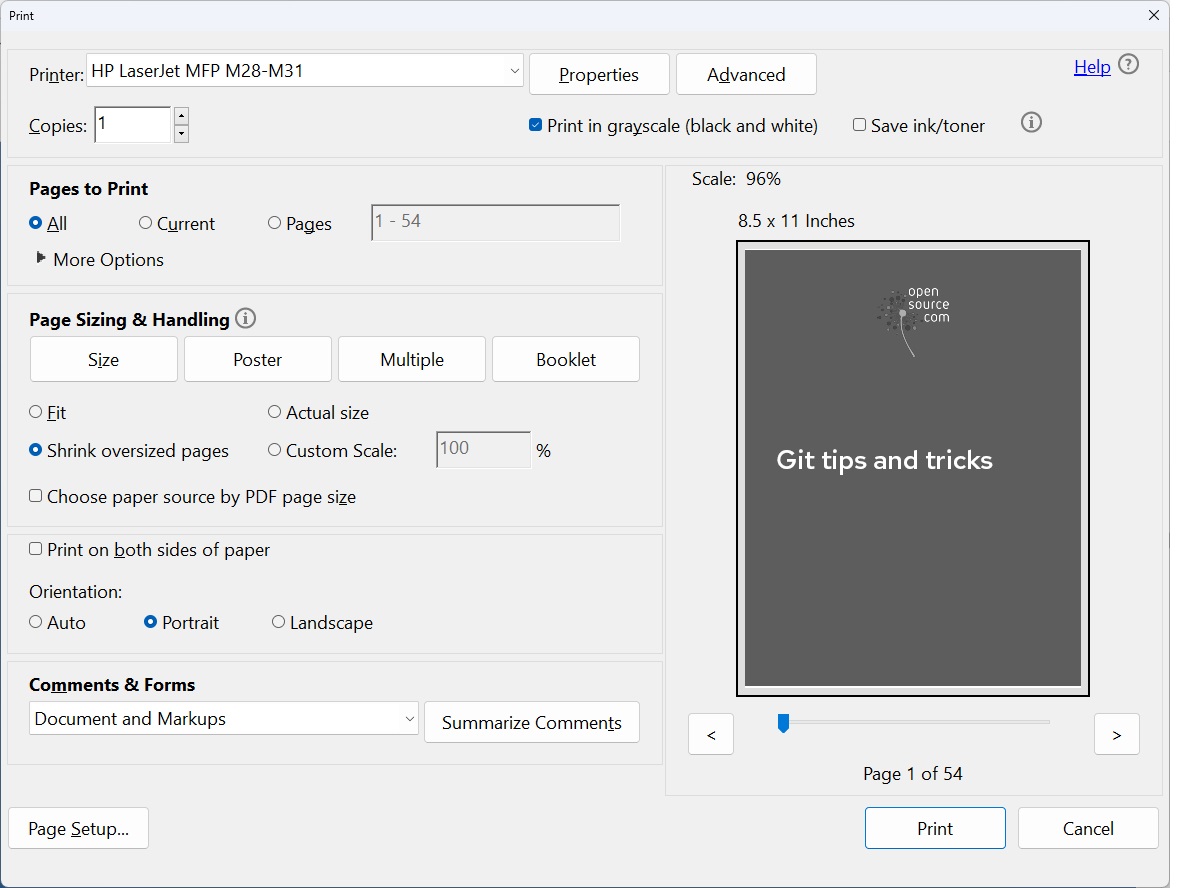
Before you execute the print command, take a look at the print options of the program from which you are printing. In many cases you can additionally set monochrome printing here. In Acrobat, for example, you will find the option Print in grayscale (black and white). If you tick this option, the program converts a color PDF document into grayscale. You can see the result in the preview window. Only now click on Print.
Special case photo printing: As a rule, these measures help with all grayscale prints on normal paper. In photo printing on special photo paper, however, most four-color printers continue to use colored dots. They help to smooth edges and show shading better. As a side effect, however, they create color casts. Grayscales then appear too green, too blue, or too red.
To eliminate the color distortions, you have to trick your printer: To do this, select the best print medium in the printer driver that the printer accepts as normal paper — such as Brother inkjet paper, Canon High Resolution Paper, Epson Photo Quality Inkjet Paper, or HP presentation paper. Set the highest possible resolution.
If your printer complains that the settings in the driver and device differ, you must also assign the inkjet paper to the appropriate paper tray directly on the printer’s control panel. Often, you can also define the black coverage either in the driver or in the image editing program. This way the photo is printed lighter or darker.
Make test prints on normal paper. Only when the result is satisfactory, replace the plain paper with a high-quality photo paper. The finished printout will not reach the printer’s highest resolution, but it will not show any annoying color casts.
Exploit the savings potential in the driver
Every printer can be economical with paper and ink/toner. However, it depends on the printer model how many settings are available for this. The more finely you can tune the output device via the driver, the more you will exploit the potential for saving ink and paper.
This is how you proceed: A good saving measure is the draft or toner saving mode. You will find it in the printer driver in the Main settings usually under Quality. The mode reduces the ink application of all colors. Since many printer models put a lot of ink on the paper at standard resolution, the economy setting is often worthwhile for all everyday printing. You do not run the risk of not being able to read texts.
IDG
If your printer model does not provide a special draft mode, look for manual settings in the driver to reduce the coverage. You will usually find what you are looking for under More options. The print colors can often be influenced via sliders. In many cases, it is enough to increase the brightness of the printout to reduce ink coverage and thus save ink/toner.
Duplex printing helps save paper. If your printer can automatically print on the front and back of a sheet, you usually activate the function directly in the main settings in the driver. You still have to control whether the sheet is turned over the short or the long edge of the paper. Duplex printing is only possible manually, mainly with entry-level devices. Once it is activated, a wizard shows you when and how to turn the sheets to print on the front and back. This feature is also worthwhile to keep paper consumption in check for longer documents.
The multi-page mode allows you to place several pages on one printout. For this purpose, they are displayed in a reduced size, but remain easily legible. You can usually find this function in the Layout area or directly in the main settings. In addition to the number of pages on a sheet, you can also determine the arrangement. Whether you place the pages next to each other or on top of each other depends on the document. The same applies to the number of pages that make sense on a printout. Economy foxes combine duplex printing with multi-page mode for maximum paper savings.
If you have a multifunction printer with automatic duplex printing, it is also worth taking a closer look at the settings on the control panel. Because then it can also make copies on both sides, thus limiting paper consumption.