Simulate colored pencils, watercolors, chalk pastels, charcoal, pen and inks, crayons, and many other artistic methods.
Adobe Photoshop’s huge selection of Artistic Filters can’t possibly be covered in one story, but we can show you some of our favorites to help you get started. The real fun starts when you learn to mix them into new and even more astounding effects, such as Fresco and Paint Daubs together, or Poster Edges with Watercolors.
In this story we’ll introduce, explain, and show examples of these amazing features. Click the links in the list below to get to specific artistic filters:
How do Photoshop’s Artistic filters work?
Each filter creates one or more artistic effects with multiple, custom settings per effect. They’re all different. The filters are located under the Filter tab on the main PS menu. There must be an open image for this menu option to function.
For the Artistic filters, select Filter > Filter Gallery > Artistic Filters. Scroll through the 15 filter options and choose one that fits your project, or browse through the rest of this article to learn all about these features.
Notice the formats: The Settings (name and range) are defined once in the beginning of the first paragraph. The following examples list the user’s selected range (inside parentheses). Images are identified as (TL = top left), (TR = top right), (BL = bottom left), and BR (bottom right).
All about the Artistic filter Colored Pencils
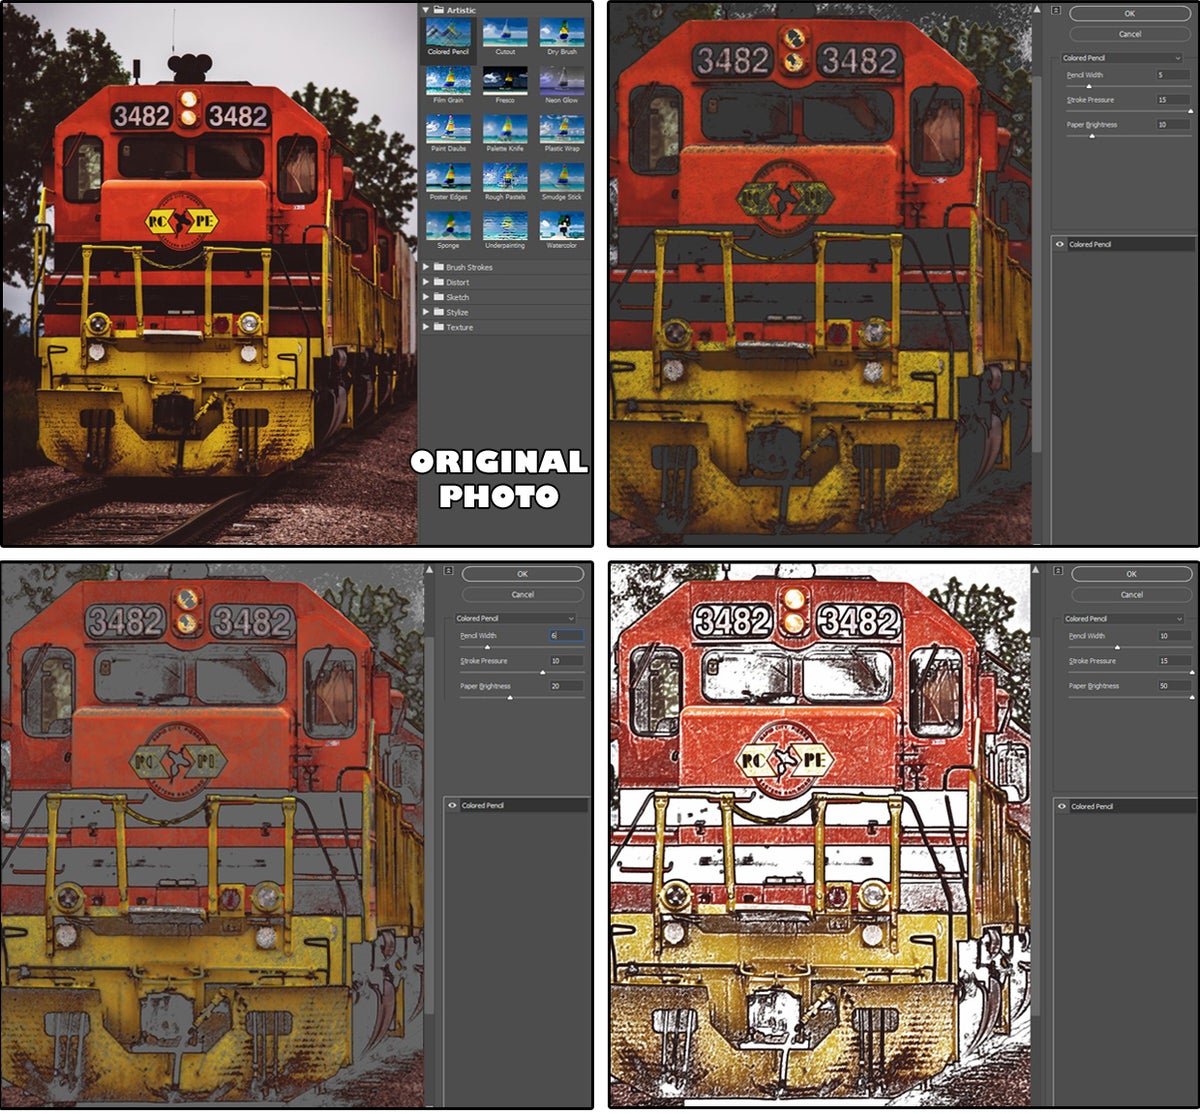
The colored-pencil filter works best on images with multiple, bright colors. Choose an image, then select Filter > Filter Gallery > Artistic Filters > Colored Pencils. The customizable settings include Pencil Width (1 thru 24), Stroke Pressure (0 thru 15), and Paper Brightness (0 thru 50). Notice the examples in figure 01 Colored Pencils.
The first image (TL) shows the original photo. The second image (TR) has darker colors with a thin, lighter stroke (5, 15, 10). The third image (BL) mutes the colors and increases the stroke slightly (6, 10, 20). And the fourth image (BR) maximizes the stroke and the brightness/contrast (10, 15, 50). These are all effective for artistic purposes; however, if combined with other filters, results are amazing.
Adobe Photoshop’s huge selection of Artistic Filters can’t possibly be covered in one story, but we can show you some of our favorites to help you get started. The real fun starts when you learn to mix them into new and even more astounding effects, such as Fresco and Paint Daubs together, or Poster Edges with Watercolors.
In this story we’ll introduce, explain, and show examples of these amazing features. Click the links in the list below to get to specific artistic filters:
- Colored Pencils
- Cutout
- Dry Brush
- Film Grain
- Fresco
- Neon Glow
- Paint Daubs
- Palette Knife
- Plastic Wrap
- Poster Edges
What are Photoshop’s Artistic filters?
In a nutshell, Photoshop Artistic filters are computerized, artistic techniques (or special effects) that enable you to create images that simulate artistic styles such as colored pencils, watercolors, chalk pastels, charcoal, pen and inks, crayons, and dozens of other artistic media. In the current version of PS, there are over 225 special effects filters.
Six categories of filters are available in the Filter Gallery: Artistic, Brush Strokes, Distort, Sketch, Stylize, and Texture, with dozens of filters inside each category. There are also 16 additional filter categories under the Filter menu, with yet more filters inside those categories.
How do Photoshop’s Artistic filters work?
Each filter creates one or more artistic effects with multiple, custom settings per effect. They’re all different. The filters are located under the Filter tab on the main PS menu. There must be an open image for this menu option to function.
For the Artistic filters, select Filter > Filter Gallery > Artistic Filters. Scroll through the 15 filter options and choose one that fits your project, or browse through the rest of this article to learn all about these features.
Notice the formats: The Settings (name and range) are defined once in the beginning of the first paragraph. The following examples list the user’s selected range (inside parentheses). Images are identified as (TL = top left), (TR = top right), (BL = bottom left), and BR (bottom right).
All about the Artistic filter Colored Pencils
The colored-pencil filter works best on images with multiple, bright colors. Choose an image, then select Filter > Filter Gallery > Artistic Filters > Colored Pencils. The customizable settings include Pencil Width (1 thru 24), Stroke Pressure (0 thru 15), and Paper Brightness (0 thru 50). Notice the examples in figure 01 Colored Pencils.
The first image (TL) shows the original photo. The second image (TR) has darker colors with a thin, lighter stroke (5, 15, 10). The third image (BL) mutes the colors and increases the stroke slightly (6, 10, 20). And the fourth image (BR) maximizes the stroke and the brightness/contrast (10, 15, 50). These are all effective for artistic purposes; however, if combined with other filters, results are amazing.
 JD Sartain / IDG
If you need an outline of your image, most artists use Filter > Stylize > Find Edges. If that solution is unsatisfactory; increase the contrast on your image (such as Image > Adjustments > Brightness/Contrast > Contrast 75), then apply the Colored Pencils filter (15, 15, 50), which provides a more defined stroke throughout the image.
Next, remove the colors using Image > Adjustments > Desaturate. If the outlines are still minimally defined, then add the effect Filter > Stylize > Find Edges and the outlines should then pop.
All about the Artistic filter called Cutout
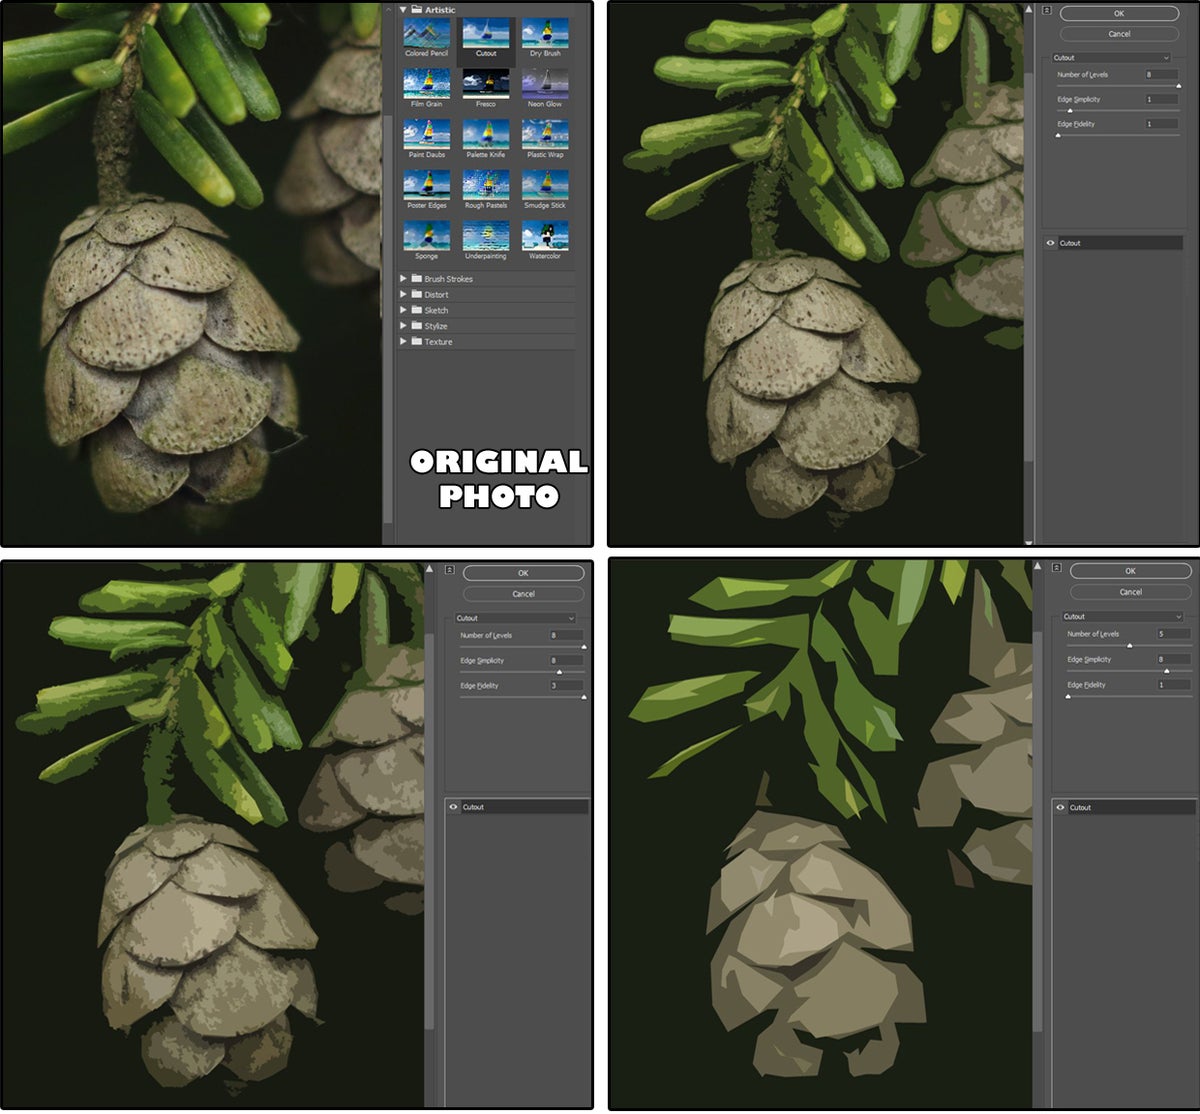
The Cutout filter works best on images with uncluttered backgrounds, bright colors, and simple images. Choose an appropriate photo, then select Filter > Filter Gallery > Artistic Filters > Cutout. The customizable settings include number of levels (2 thru 8), obviously, how many cutout levels you want based on colors and luminosity; edge simplicity (0 thru 10) adjusts the angles of the corners; and edge fidelity (1 thru 3) affects how smooth the edges become. Notice the examples in figure 02 Cutout filter.
The first image (TL) shows the original photo. The second image (TR) has multiple cutouts with minimal edges (8, 1, 1). The third image (BL) has maximum cutouts with multiple to maximum edges (8, 8, 3). And the fourth (BR) has midrange cutouts with mid to minimal edges (5, 8, 1). If your project includes creating posters, patterns for linocuts (print making), or silk screen designs, this filter is a good choice.
 JD Sartain / IDG
All about the Artistic filter called Dry Brush
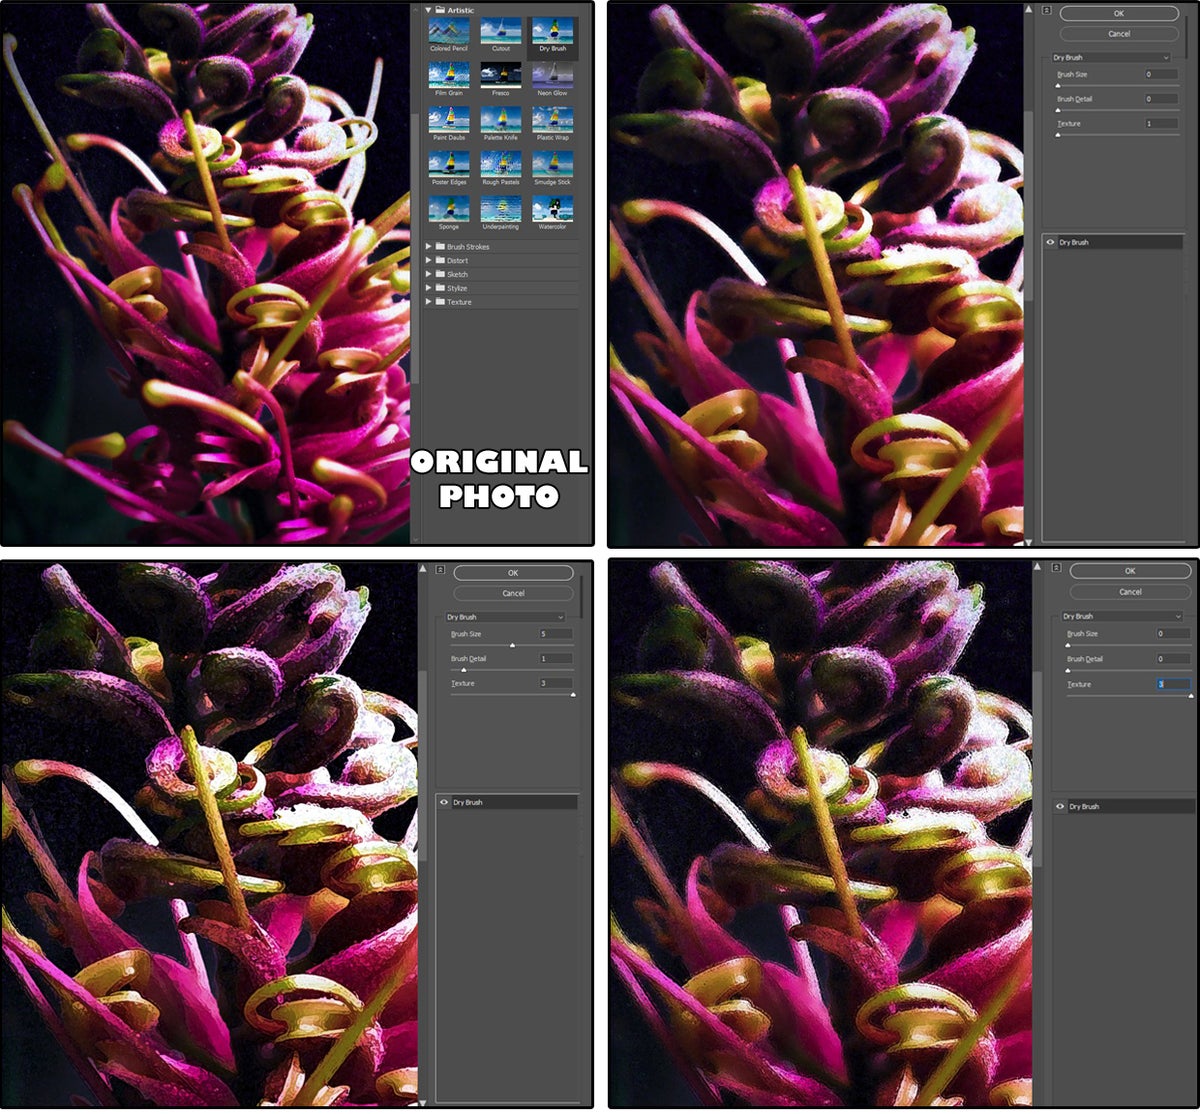
Use the Dry Brush filter to create the illusion of a painting. Any photo, drawing, or even a scanned painting will work. Choose an image, then select Filter > Filter Gallery > Artistic Filters > Dry Brush. The customizable settings include brush size (0 thru 10); brush detail (0 thru 10); and texture (1 thru 3). Notice the examples in figure 03 Dry Brush filter.
The first image is the original photo. The second image (TR) minimally alters the texture only (0, 0, 1). Next, (BL) has midrange to minimal brush settings and maximum texture (5, 1, 3). And the last (BR) maximizes the texture only (0, 0, 3). If you have ever painted with a dry brush, this filter is a decent match.
 JD Sartain / IDG
All about the Artistic filter called Film Grain
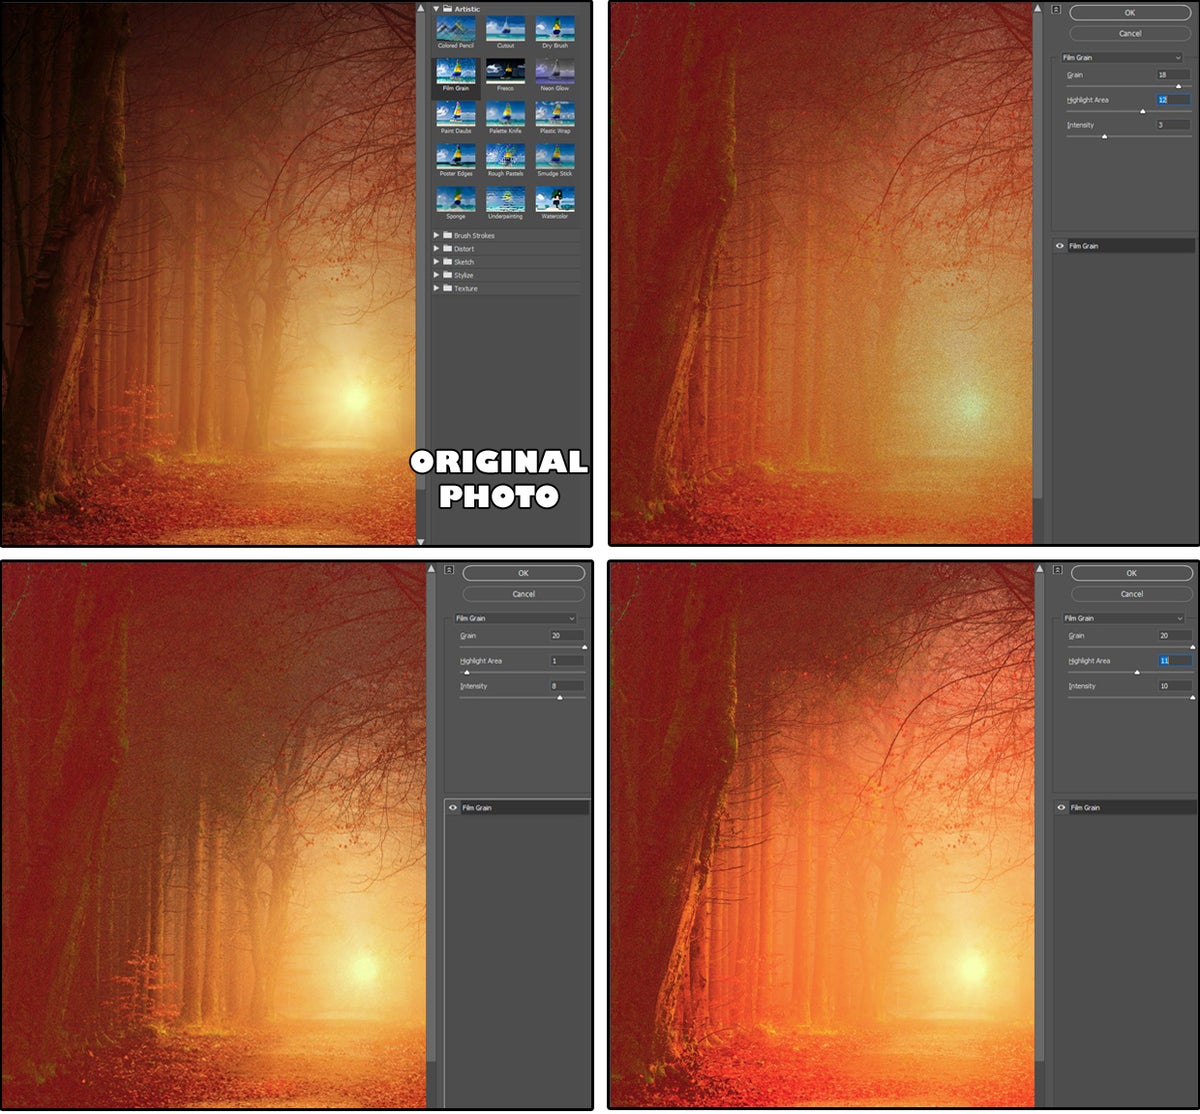
Excess film grain creates that wonderful “vintage photo” look, especially when the image is in black-and-white or sepia-toned. This filter also emulates that “grainy” feature that you get when you use high-speed film with ISO settings between 400 and 800, or when you over-develop or under-expose film, or use infrared film.
For this illusion, any photo or illustration will suffice. Choose an image, then select Filter > Filter Gallery > Artistic Filters > Film Grain. The customizable settings include Grain (0 thru 20); Highlight Area (0 thru 20); and Intensity (0 thru 10). Notice the examples in figure 04 Film Grain filter.
First, the original photo. Next, (TR) has minimal grain (18, 12, 3). Next, (BL) has a little more (20, 1, 8). And last (BR) has even more (20, 11, 10). The grain results with this filter are subtle and look very different based on the image you choose.
If you prefer more grainy images with higher settings, try using the effect Filter > Noise > Add Noise > Uniform (or Gaussian) from 0.10 thru 400, in monochromatic or Kodachrome. Or, you can also try Filter > Filter Gallery > Texture > Grain (this one has 10 grain types to choose from).
 JD Sartain / IDG
All about the Artistic filter called Fresco
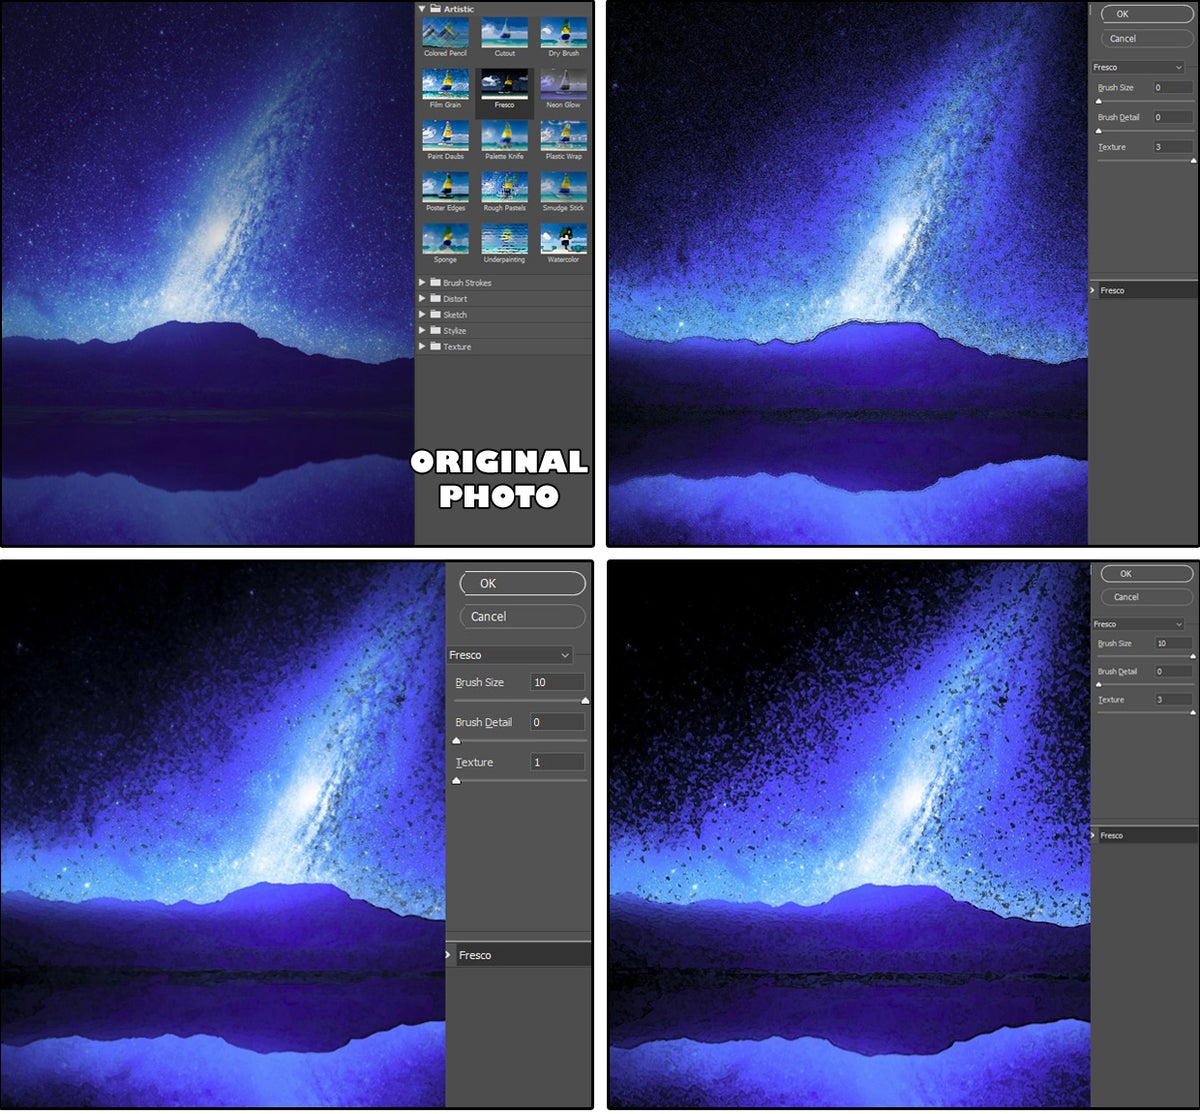
Photoshop’s Fresco filter (which simulates the warm, saturated effect of a wet-plaster painting method best known from examples in the ruins of Pompeii and the murals of the Italian Renaissance) works especially well with photos using bright colors and high contrast. Choose an image, then select Filter > Filter Gallery > Artistic Filters > Fresco. The customizable settings include brush size (0 thru 10); brush detail (0 thru 10); and texture (1 thru 3). Notice the examples in figure 05 Fresco filter.
After the original photo (TL), the (TR) image has minimal brush settings with maximum texture (0, 0, 3). Next, (BL) has maximum brush, minimum texture, and no detail (10, 0, 1). And last, (BR) has maximum brush and texture with zero detail (10, 0, 3). Notice how the image progresses from a simple nightscape to a nocturnal explosion that resembles a blue and white volcano.
 JD Sartain / IDG
All about the Artistic filter called Neon Glow
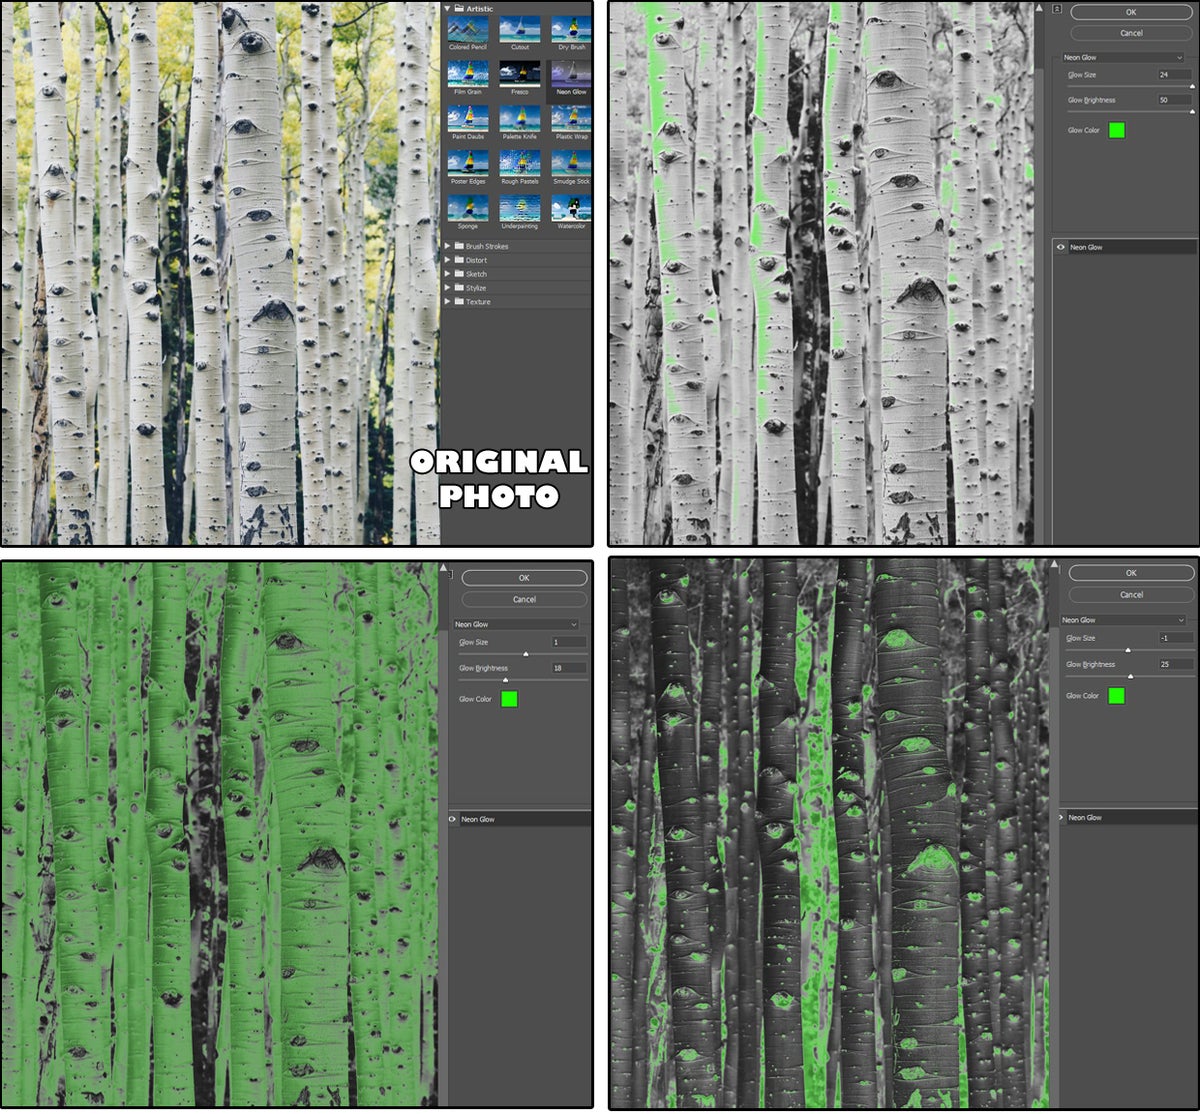
This filter does precisely what it’s called: It creates a glowing area inside, outside, around, or on the edges of your photo.
Choose an uncluttered image with a single or group of similar objects for best results. The final image is reduced to minimal colors: the glow color, the background color, and (sometimes) a combination of the two.
Select Filter > Filter Gallery > Artistic Filters > Neon Glow. The customizable settings include Glow Size (-24 thru +24) and Glow Brightness (0 thru 50). Then you need to choose a color from the Glow Color palette. Notice the examples in figure 06 Neon Glow filter.
After the original photo (top left), the (top right) image settings are (+24, 50, fluorescent green). Next, the bottom left image settings are (+1, 18, fluorescent green). And last, the bottom right image settings are (-1, 25, fluorescent green). Notice how the images progress from a simple neon glow on white to 100-percent neon to a reverse video effect with neon on black.
 JD Sartain / IDG
All about the Artistic filter called Paint Daubs
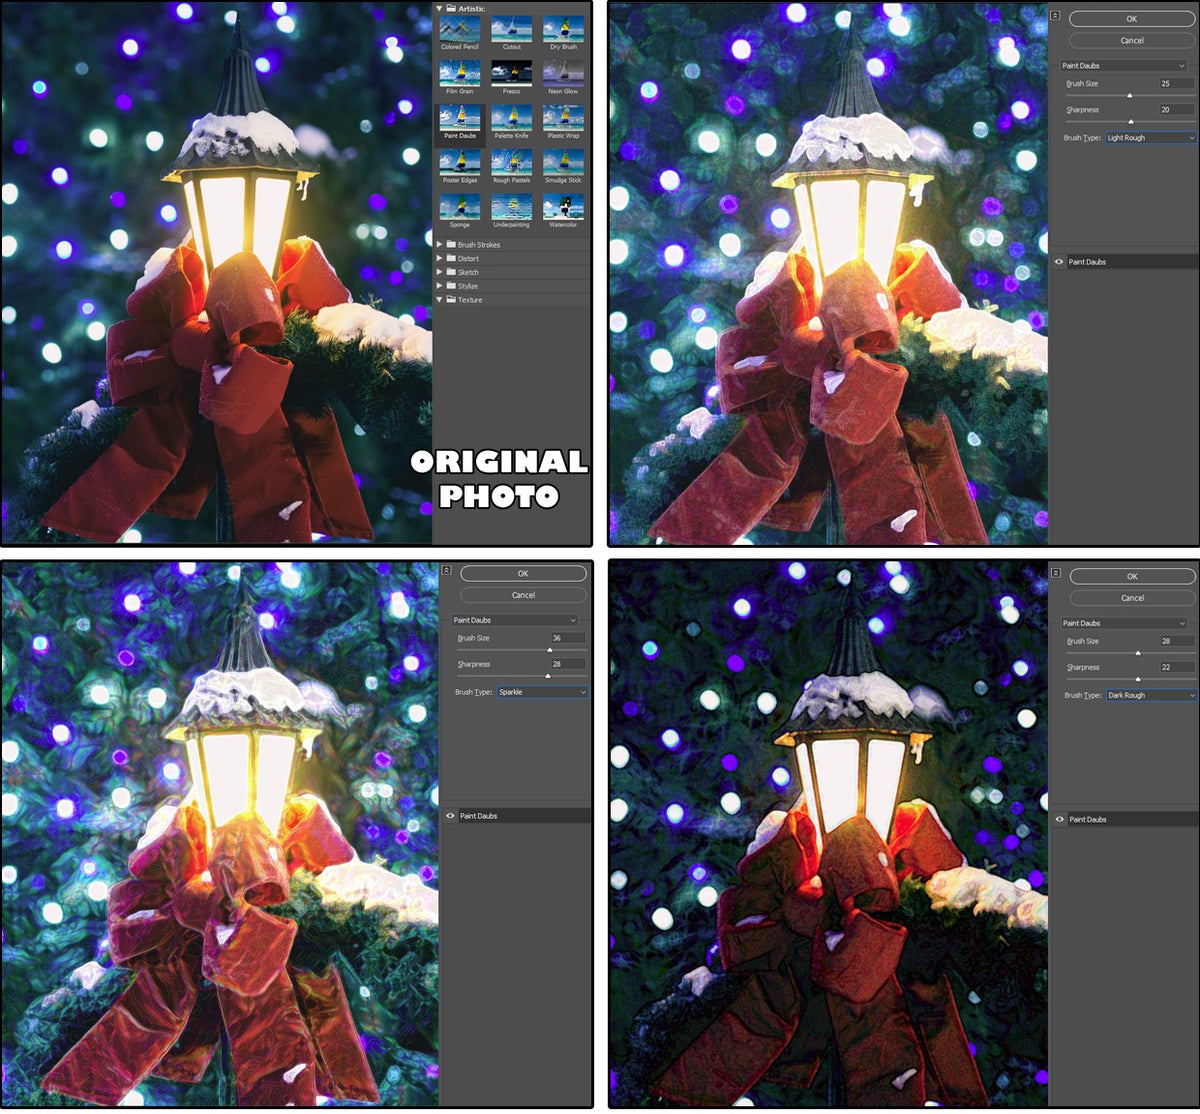
Like the other “painting” filters, the Paint Daubs filter is modeled after the famous Italian “Impasto” technique used by artists such as Rembrandt, Van Gogh, Jackson Pollock and others. Basically, the artist applies thick layers of paint onto a canvas to create textures and definition.
Select Filter > Filter Gallery > Artistic Filters > Paint Daubs. The customizable settings include Brush Size (1 thru 50); Sharpness (0 thru 40); and then you must choose a Brush Type from the list box (Simple, Light Rough, Dark Rough, Wide Sharp, Wide Blurry, or Sparkle). Notice the examples in figure 07 Paint Daubs filter.
After the original photo (top left), the top right image settings are (25, 20, Light Rough). Next, the bottom left image settings are (36, 28, Sparkle). And last, the bottom right image settings are (28, 22, Dark Rough).
 JD Sartain / IDG
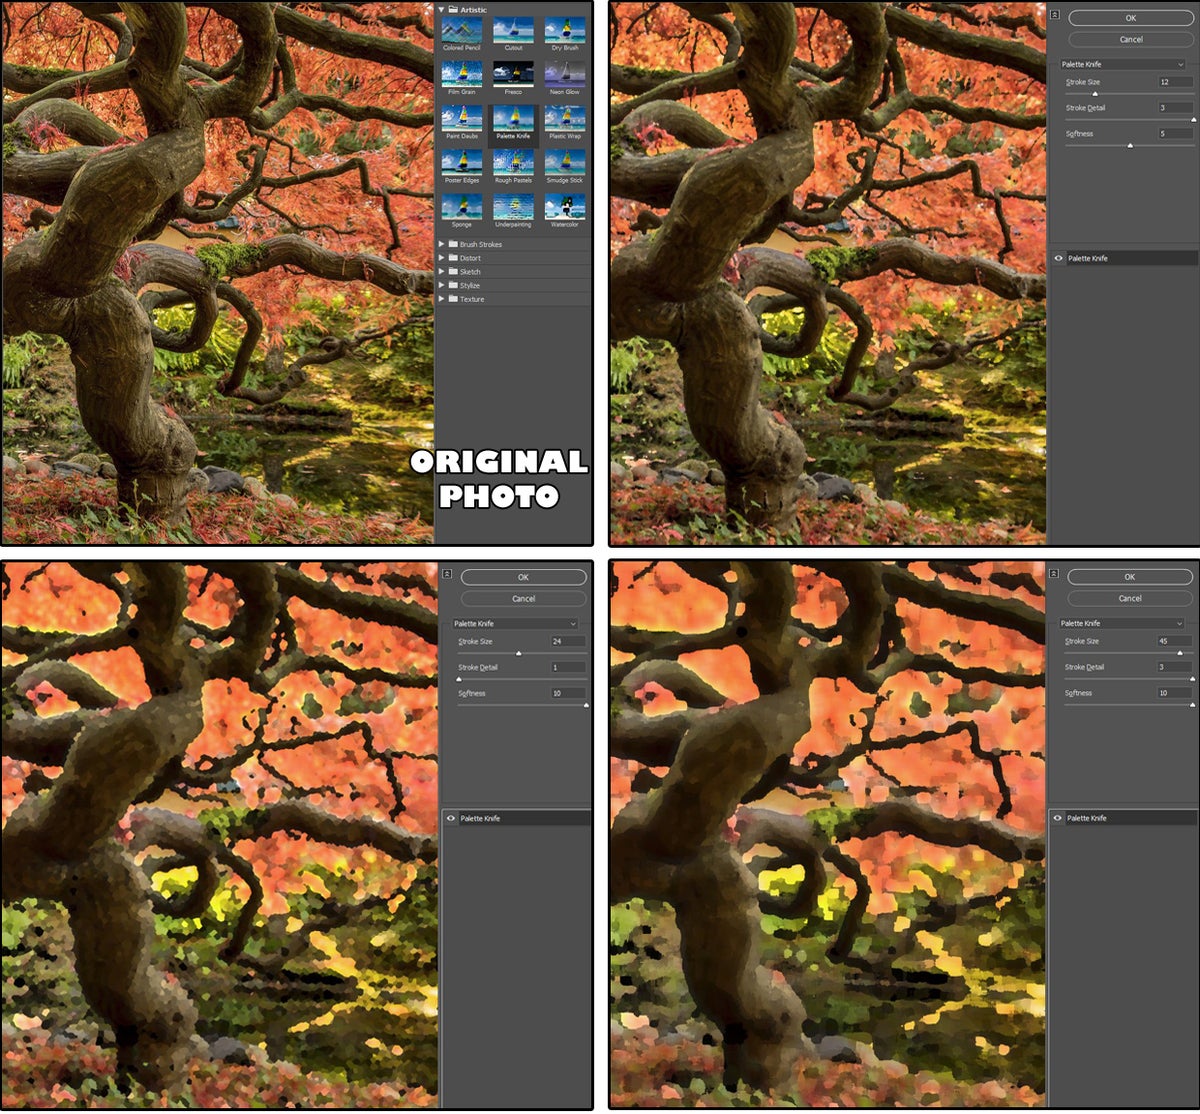
All about the Artistic filter called Palette Knife
The Palette Knife filter looks just like its real-life cousin, but without the actual knife. Also identified as another Impasto technique that involves applying paint to canvas with a painting knife, this 19th-century skill was a Van Gogh favorite.
Select Filter > Filter Gallery > Artistic Filters > Palette Knife. The customizable settings include Stroke Size (1 thru 50); Stroke Detail (1 thru 3); and Softness (0 thru 10). Notice the examples in figure 08 Palette Knife filter.
After the original photo (top left), the top right image settings are (12, 3, 5). Next, the image settings at bottom left are (24, 1, 10). And last, the bottom right image settings are (45, 3, 10).
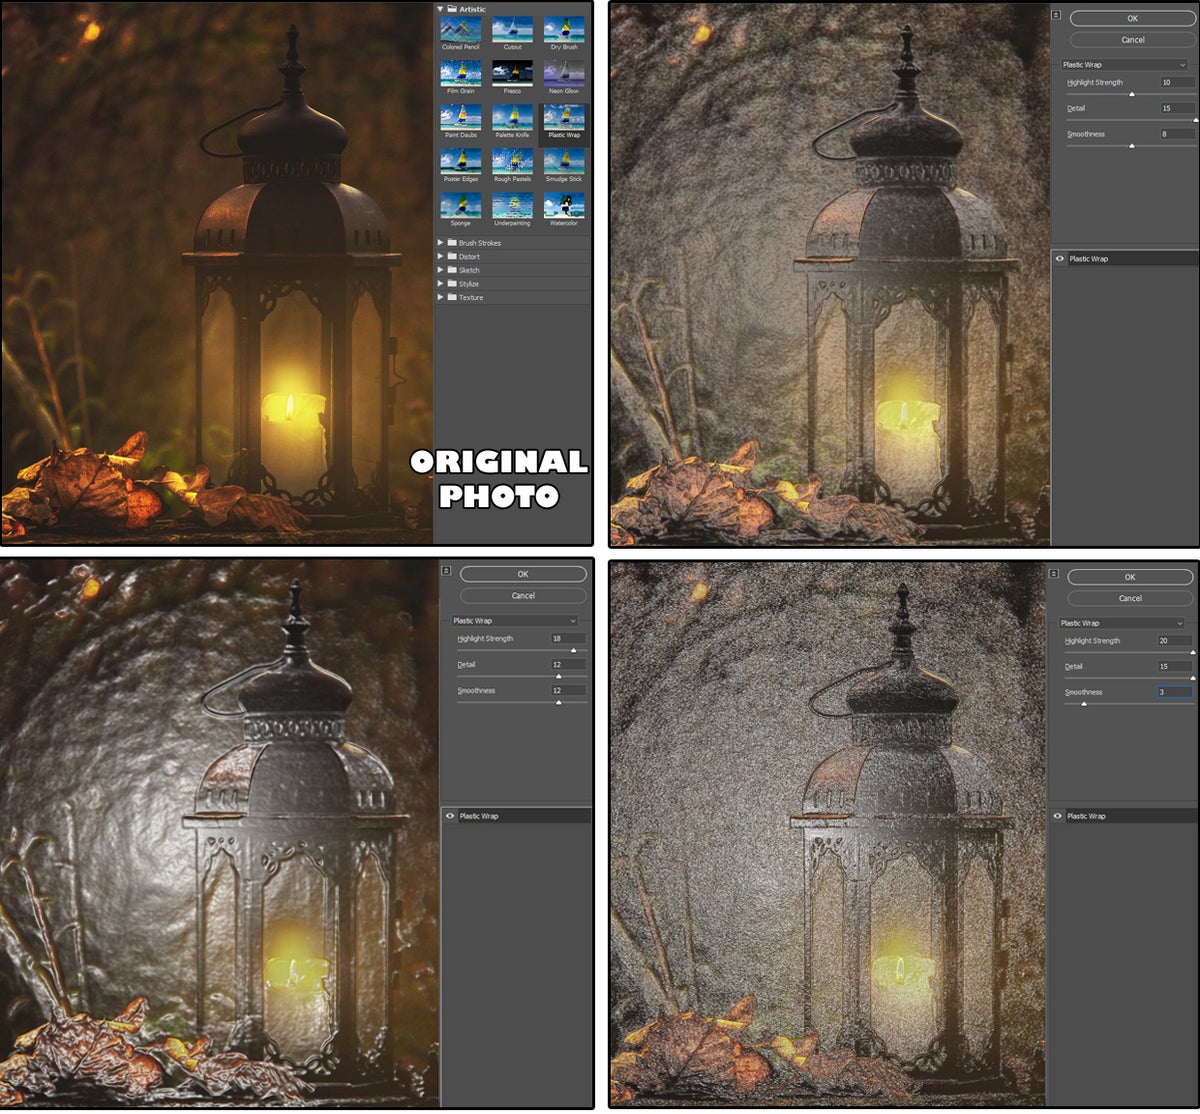
All about the Artistic filter called Plastic Wrap
Unique by itself, the Plastic Wrap filter looks just like an object wrapped in cellophane! It’s an interesting technique patterned after no other and, yet, produces wonderful effects.
Select Filter > Filter Gallery > Artistic Filters > Plastic Wrap. The customizable settings include Highlight Strength (0 thru 20); Detail (1 thru 15); and Smoothness (1 thru 15). Notice the examples in figure 09 Plastic Wrap filter.
After the original photo (top left), the top right image settings are (12, 3, 5). Next, the bottom left image settings are (24, 1, 10). And last, the bottom right image settings are (45, 3, 10).
 JD Sartain / IDG
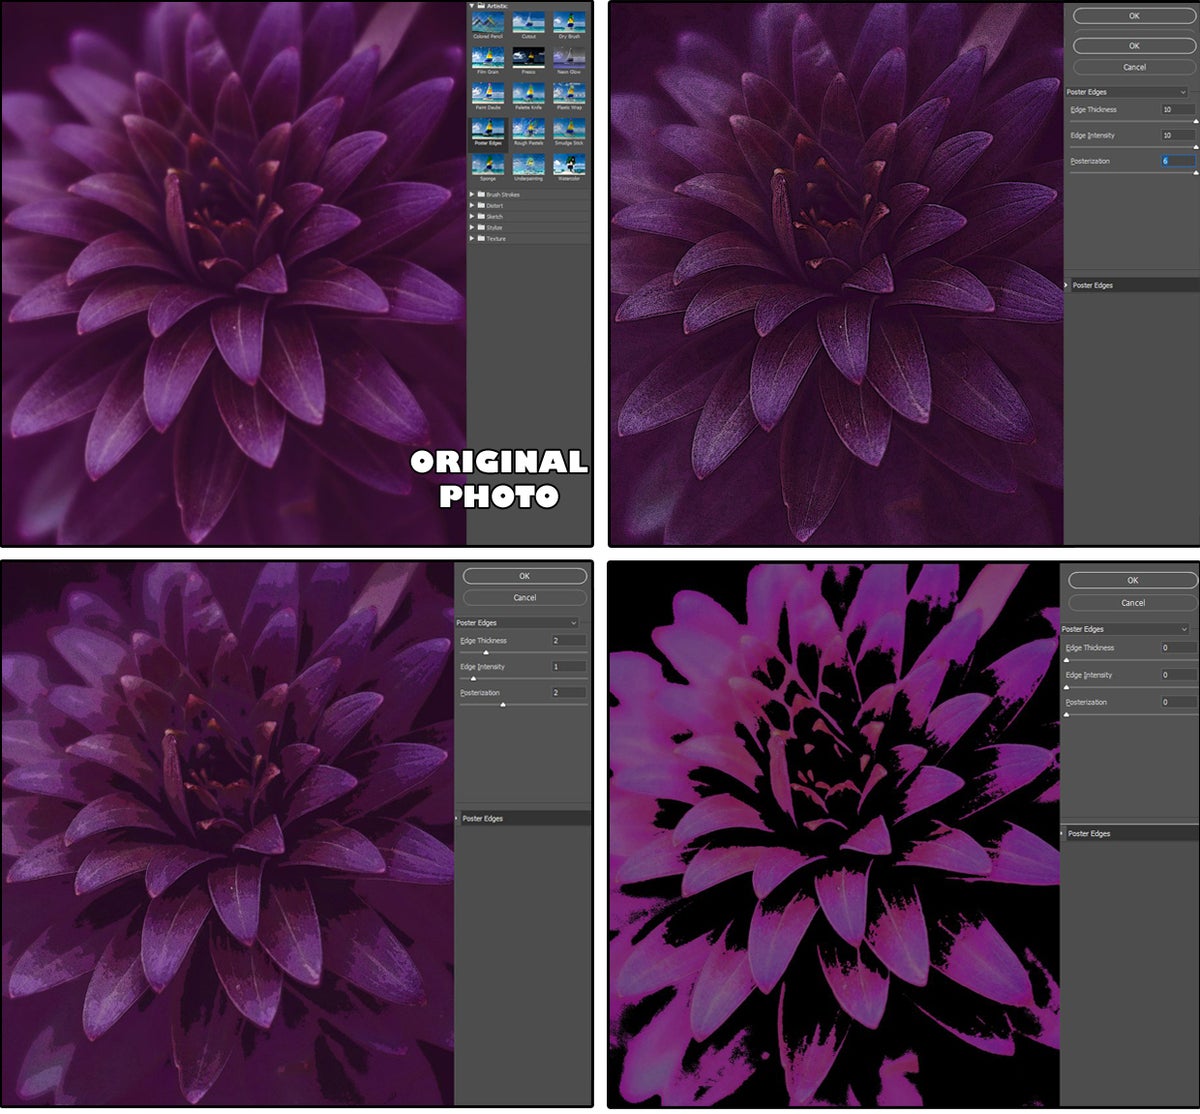
All about the Artistic filter called Poster Edges
The Poster Edges filter is similar to the Cutout filter; but only in the lower settings. When the higher settings are applied, this effect looks more like one of the Brush Strokes filters.
Select Filter > Filter Gallery > Artistic Filters > Poster Edges. The customizable settings include Edge Thickness (0 thru 10); Edge Intensity (0 thru 10); and Posterization (0 thru 6). Notice the examples in figure 10 Poster Edges filter.
The first one (top left) is the original photo, the top right image settings are (10, 10, 6). Next, the image settings at bottom left are (2, 1, 2). And last, the bottom right image settings are (0, 0, 0). Like the Cutout filter, this filter works especially well for posters, linocuts (print making), silkscreen designs, stamps, and stencils.