How to access, use, edit, create, import, and download Photoshop Styles
How to import/load more Photoshop Styles
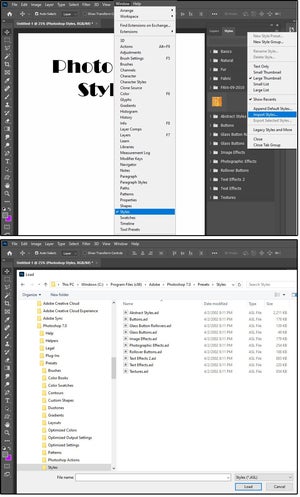
If you have any older versions of Photoshop on your computer, you can import all the Styles from those other Style collections and build up your library. Click the menu icon (four stacked lines) in the top-right corner of the Styles panel, then navigate to the Adobe > Photoshop > Presets > Styles folder.
The extension for Styles is .asl. You cannot use Ctrl+ A to select them all from the list of files—you have to import them one at a time. So, select the first one and click the Load button. Follow this same procedure to import any other styles you wish. You can easily delete Styles and load more at any time.
 JD Sartain / IDG
How to use Photoshop Styles
Using Photoshop Styles is a breeze. Once you learn how the Style Effects work, you can enhance your text and images to help them pop off the page or screen. Editing styles is a bit more complicated, but still not too difficult.
To begin, ensure that the combination Layers and Styles panels are displayed on the screen.
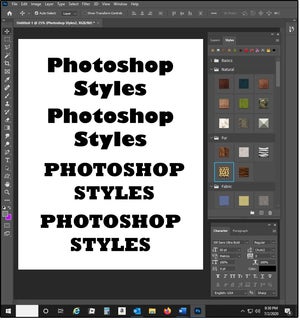
1. Open an 8×10 x 300 ppi Photoshop file.
2. Use the Text tool and type Photoshop Styles across the top. Use a thick font such as Impact, Gil Sans Ultra Bold, Broadway, Franklin Gothic Heavy, or Rockwell Extra Bold, and size it to 60 points. These fonts came with Adobe, so you should have them on your system.
3. Duplicate three times, and make two of them all-caps.
4. Place your cursor on the first “Photoshop Styles” phrase in the Layers panel, then click the Styles tab.
5. Browse through the various style icons and choose one to try, or use our examples below.
 JD Sartain / IDG
How to edit Photoshop Styles
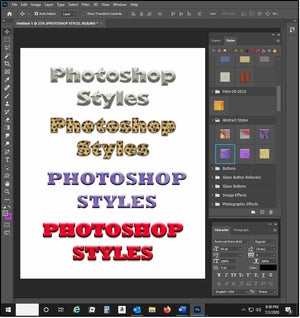
For the first one, choose the Style called “Tile.” Notice how the text has a sculptured, three-dimensional look, but the color is white and so is the background.
1. Let’s change the Color:
a. Click the Layers tab. Right-click the layer called Photoshop Styles (in lowercase) and choose Blending Options from the dropdown list.
b. In the left panel, click the word Color. In the Color Picker dialog, select a nice, dark blue, then click OK.
c. Next, slide the Opacity bar from 31% to 100% and click OK.
2. Now, let’s change the Drop Shadow:
a. Click the Layers tab again. Right-click the layer called Photoshop Styles2 (in lowercase) and choose Blending Options from the dropdown list.
b. In the left panel, click the words Drop Shadow. In the center of the panel, move the Distance slider from 7 to 20 px. Then move the Spread from 13 to 23 percent. And last, move the Size from 16 down to 10.
c. Un-check Use Global Light and change the Angle to 120 degrees, then click OK.
3. Now, let’s change the Bevel & Emboss:
a. Click the Layers tab again. Right-click the layer called PHOTOSHOP STYLES (in all caps) and choose Blending Options from the dropdown list.
b. In the left panel, click the words Bevel & Emboss. In the center panel, under Structure > Style, choose Emboss from the dropdown list, and click OK.
4. And last, let’s change the Stroke (or Outline):
a. Click the Layers tab again. Right-click the layer called PHOTOSHOP STYLES2 (in all caps) and choose Blending Options from the drop-down list.
b. In the left panel, click the word Stroke. In the center panel under Stroke > Structure, change the Size from 8- to 6-point, and change the Position from Outside to Inside.
c. Under Stroke > Fill Type, change the Fill Type to Color and change the color to black, and click OK.
 JD Sartain / IDG
How to save edited Photoshop Styles
Edit an existing Style (like we did above), then save the Style with a different name. For example:
1. Right-click the first layer above called Photoshop Styles (lowercase) and choose Blending Options.
2. Click the New Style button in the Layer Style dialog and give your new style a name, such as “Blue Tile.” Click OK, OK (twice).
3. Repeat this process for the other three text layers. For Photoshop Styles2 (lowercase) name the Style: Cheetah2. For the PHOTOSHOP STYLES (all caps), name the Style: Brushstrokes2. And for the PHOTOSHOP STYLES2 (all caps) layer, name it Bright Red Bevel2.
How to create custom Photoshop Styles
There are four ways to create a new style, but only one of them allows you to do it from scratch. The other three methods require you to choose an existing, empty style that has no features or effects, and edit it (as shown above).
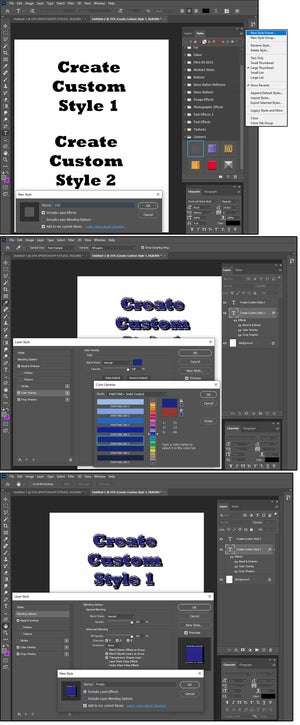
1. Open a new 8×10 x 300 ppi file and type Create Custom Style 1, then duplicate the layer and call it “Create Custom Style 2.” Be sure the Create Custom Style 1 layer is selected, then switch over to the Styles tab.
2. At the bottom, click the tiny folder icon and in the Group Name dialog, enter a name for the folder where you want to save your custom Styles, such as “Custom1.”
3. For starters, move (drag and drop) the four new styles you just edited and saved to your folder.
4. Next, select Layers > Blending Options > New Style and enter a name, such as Base (for your basic, empty Style). Notice that all the effects in the Styles panel on the left are blank, with no checked boxes. Click OK, and now you have a base/foundation on which to build new styles.
5. Select the Base Style in the Styles panel, then any of the following three options will work now.
a. Choose New Style from the Styles panel menu.
b. Click the Create New Style button on the bottom, right of the Styles panel.
c. Click anywhere in an empty area on the Styles panel.
6. Click the Layers tab, right-click one of the Layers, and when the Layer Style dialog appears, start adding effects to your new style. If you add something you don’t like, just remove it by un-checking the box for that effect.
7. For example, my new style has the following:
a. Bevel & Emboss: Style = Smooth; Technique = Smooth; Depth = 125%; Highlight Mode = Dissolve; Opacity = 75%; Shadow Mode = Dissolve; Opacity = 75%.
b. Color Overlay: Pantone 287c
c. Drop Shadow: Blend Mode = Multiply; Opacity = 100%; Angle = 140 degrees; Distance = 30 px; Spread = 30%; Size = 15 px.
d. Click the New Style button again, name it Frosty, and click OK, OK (twice). Click the Styles tab and notice your new Style in the Custom1 folder.
e. Follow the instructions above to create your own new style.
 JD Sartain / IDG
How to add patterns to Photoshop Styles
Adding patterns to your Styles is easy.
1. Open a new Photoshop file and enter the word Pat (for Patterns). Use a thick font and size it to 200 px. Duplicate the layer twice and name the layers P1, P2, and P3.
2. Select the layer for P1. Right-click, choose Blending Options > Pattern Overlay.
3. In the Layer Style dialog, center panel, click the down arrow beside the word Pattern, and open the Pattern folders.
4. Browse through the various patterns, select one you like, and click OK.


