God Mode is a hidden feature that makes it way easier to tweak various Windows settings.
Ah, it’s good to be a god. That’s what they say, right? While you may not be a deity in your own right, you can be something of a god when using Windows 11 — by enabling the hidden God Mode.
God Mode isn’t unique to Windows 11. In fact, it’s one of those little-known functions that were carried over from previous Windows versions, and it only persists to this day for who knows why.
With God Mode, you’re able to open up the operating system and tweak settings that are normally stashed away beyond reach. You’re able to tinker and tweak to your delight, and there are some useful commands and tools for everyday users as well.
Becoming one of the pantheon isn’t as difficult as you might think. With a few clicks of the mouse and a few taps on your keyboard, you can enable God Mode right now — no great sacrifices necessary.
Keep reading to learn exactly what God Mode is, how to enable it, and some of the cool things you can do with it.
What is God Mode in Windows 11?
The name “God Mode” is far more dramatic than the feature itself. It might conjure up images of uber-administrative powers, but in reality God Mode is nothing more than a special folder that contains shortcuts to special settings and options within the Control Panel.
This unique God Mode folder can be kept wherever you like so you can access it at your convenience, or you can individually relocate the shortcuts from within the God Mode folder elsewhere — to the Start menu, taskbar, or desktop, for example.
Does that sound game-changing? Maybe not. But it’s definitely useful, especially as Microsoft moves to deprecate the Control Panel, making it harder to find the Windows 11 settings you want to adjust.
What can you do with God Mode?
Activating God Mode in Windows 11 grants you instant access to over 200 different settings and options. A lot of them might be mundane or situational, but here are some of the niftier things you can do:
- Manage BitLocker drive encryption, whether that’s suspending protection, backing up your BitLocker recovery key, or turning BitLocker protection off entirely.
- Manage your network settings, whether that’s connecting to a new network, adjusting share settings, viewing network status and tasks, and troubleshooting network issues.
- Manage your energy settings, whether that’s adjusting battery options, changing what action is taken when your laptop lid is closed, changing what the power buttons do, switching or editing your current Power Plan, and changing sleep behavior.
- Add Bluetooth devices, change your default printer, set up USB peripherals, and launch Device Manager.
- Back up your files with File History and restore files to previous versions (only available after File History is enabled).
- Re-associate different file types with different apps, show or hide files and folders, show or hide file extensions, and change search options for files and folders.
- Fix your computer’s date and time, toggle automatic daylight savings adjustments, and add clocks for multiple time zones.
- Adjust dozens of accessibility settings, like changing Narrator’s voice, toggling Magnifier, optimizing the display for blindness, enabling Screen Reader, and disabling unnecessary animations.
How to enable God Mode in Windows 11

Jon Martindale / IDG
In Windows 11, God Mode isn’t really a feature that you enable. It’s more like an Easter Egg that comes to life if you happen to perform the right sequence of actions — except in this case, you actually gain access to a bunch of interesting things you can do.
Here’s how to access God Mode in Windows 11:
- Create a new folder on the desktop. To do this, navigate to the desktop, right-click an empty area, and then select New > Folder in the context menu.
- Right-click the newly created folder and click the Rename button. Alternatively, select the newly created folder and hit F2.
- Rename the folder to the following, exactly as written, including the period and curly braces:
GodMode.{ED7BA470-8E54-465E-825C-99712043E01C} - Hit Enter or click away from the folder to apply the rename.
As soon as the folder is renamed, the folder icon will change to the default folder icon or to the Control Panel icon. Either way, you’ve now successfully enabled God Mode in Windows 11!
Using God Mode
Jon Martindale / IDG
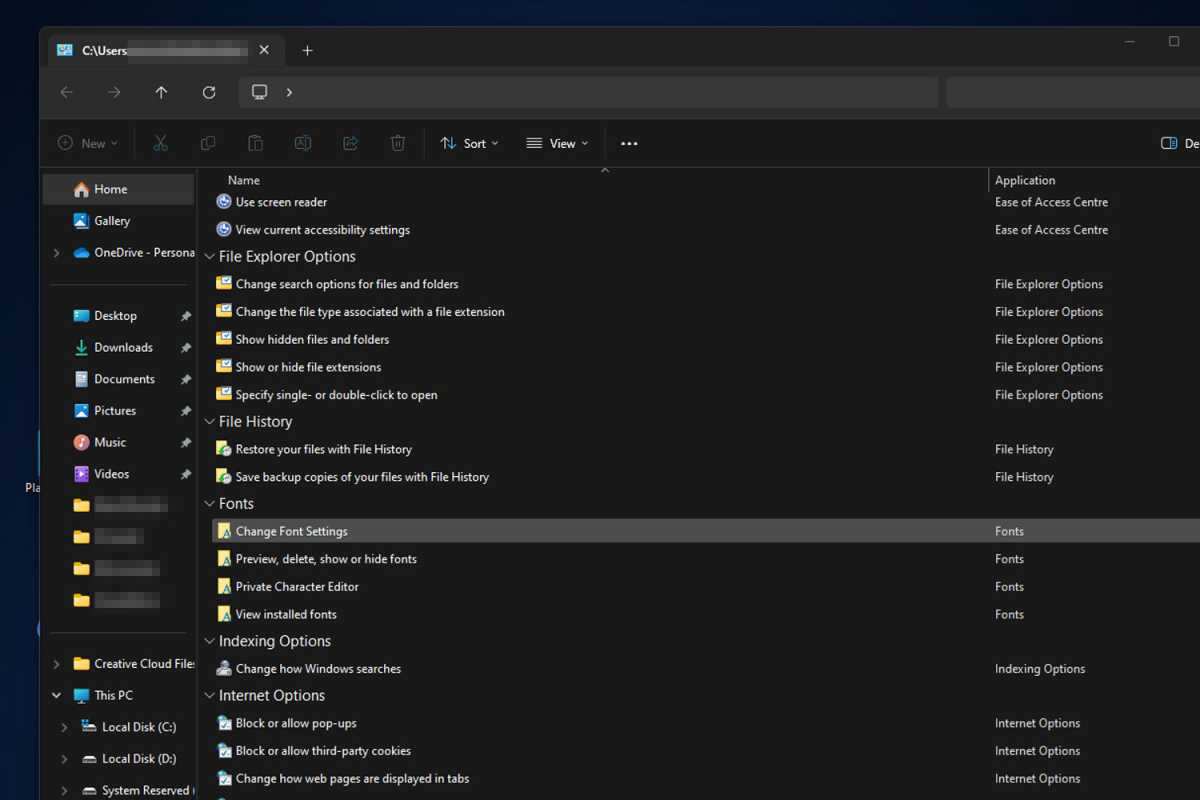
Using Windows God Mode is even easier than enabling it in the first place. Just double-click the God Mode folder to open up all the shortcuts, and then double-click the shortcut you want to use.
Optionally, you can drag-and-drop individual shortcuts to your desktop or some other folder where you can have ready access to them.
You can also create additional shortcuts for each setting in the God Mode folder (if you want access to them in multiple locations) by right-clicking each one and selecting Show more options > Create shortcut.
If you find it a bit hard to navigate the category-based organization of the God Mode settings, you can right-click an empty area of the folder and select Group by > Name to list the options alphabetically.
Would you rather view the settings as icons instead of text links? Right-click anywhere in the folder and select View, then choose your preferred icon size in the context menu.
How to disable God Mode
Don’t want to use God Mode any more? No trouble. All you have to do is select the God Mode folder and hit Delete. Alternatively, you can right-click on the folder and select Delete in the context menu.
If you moved the God Mode settings shortcuts to other folders and locations, simply delete those shortcuts.
You can always re-enable God Mode anytime by following the above steps again, or you can save your favorite shortcuts and delete the main folder. It’s entirely up to you.

