Changing these five settings makes Windows 11 much better in under five minutes of your time.
While Windows 11 provides a decent enough out of the box experience—atrocious new task bar aside—it handles so much better after tweaking just a handful of settings to make it feel more like the Windows of yesteryear.
No, I’m not talking about making Windows 11 look like Windows 10 through an extensive overhaul (though if you’re a Windows veteran that’s worth doing) or tinkering with the newfangled AI options on Copilot+ PCs. I’m talking about fast, simple changes that improve the feel of the operating system, turn off annoying ads, reduce the data you send to Microsoft, and more. Better yet, you can do them all in under five minutes—something I did mere weeks ago when I needed to pick up a Windows 11 laptop for some travel.
Here are five Windows 11 settings worth changing immediately, with an added bonus at the end.
1. Move the Start button to the left corner
What can I say, I’m a traditionalist. I understand Microsoft’s desire to revamp Windows 10’s interface to more closely mirror the style of Macs and Chromebooks—legions of kids get schooled on those, after all—but Windows 11’s shifting taskbar icons drive me batty. I want mousing over to the Start menu to be muscle memory in a set location, not yet another task I have to look at and mentally process.
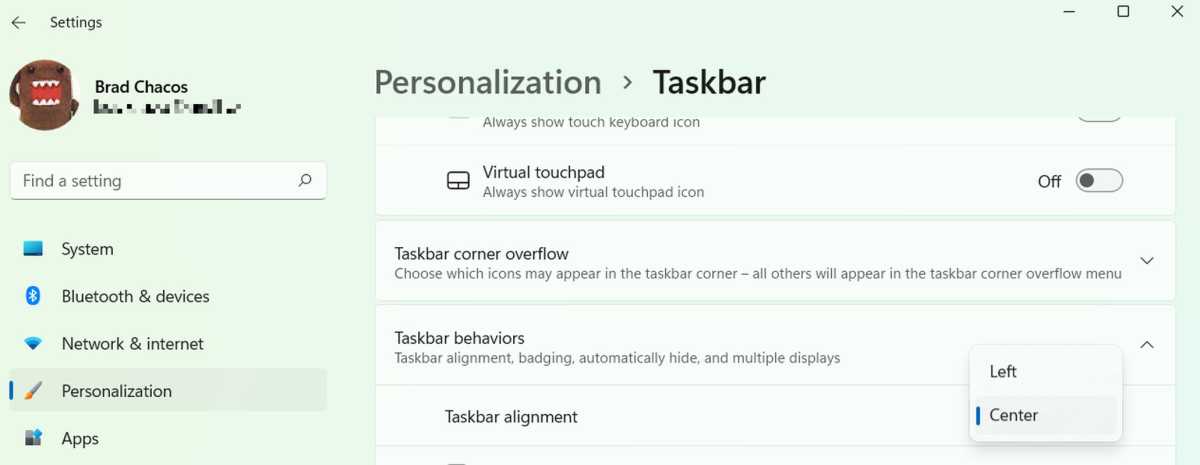
Fortunately, Microsoft makes it easy to move the Start menu back to the left-hand corner. Simply open the Start menu and head to Settings > Personalization > Taskbar > Taskbar behaviors. You’ll see a field labeled Taskbar alignment with a drop-down menu. Change the drop-dox menu from Center to Left.
Boom! Onto the next.
2. Turn off annoying notifications
Next, it’s time to turn off those annoying pop-up notifications. Windows 11 itself spawns some, but the worst offenders are third-party apps, especially if your laptop or desktop came preloaded with bloatware. Making the distractions stop is simple.
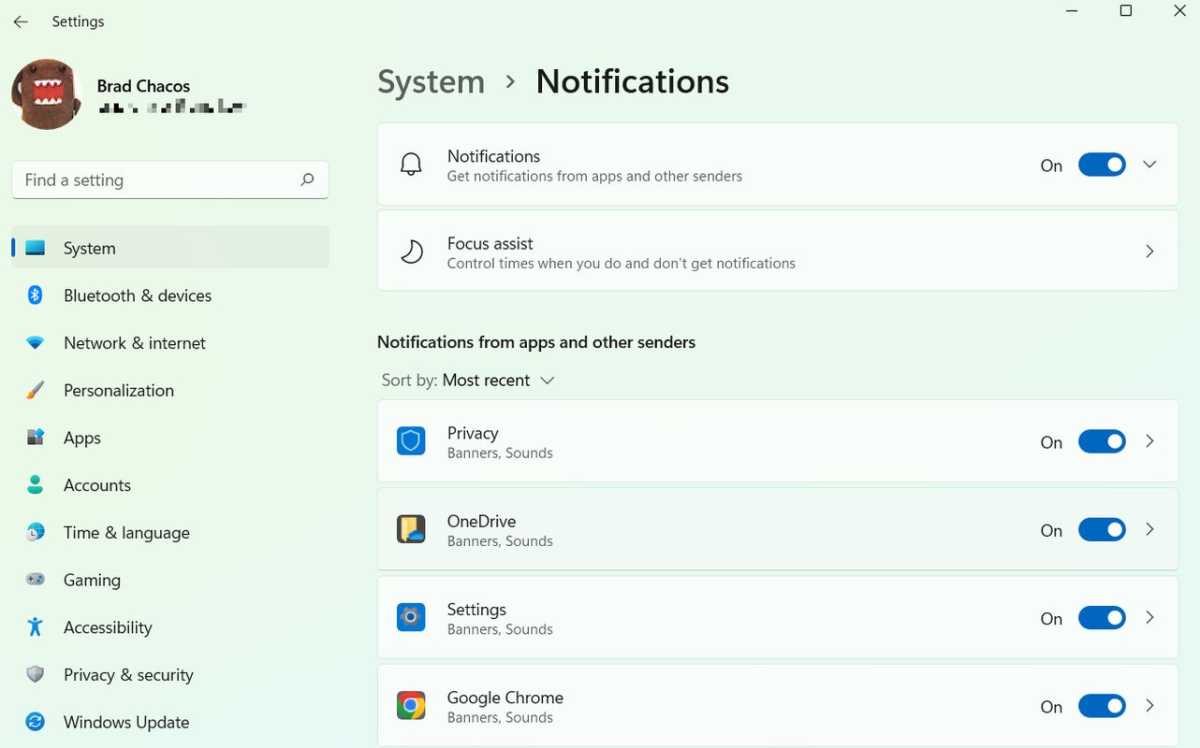
Head to Start > System > Notifications. You can turn notifications off universally if you desire. I prefer to work through the list manually, leaving notifications on for critical tools like Slack, Discord, and my antivirus software. (If my AV scanner wants to shout about something, I want to hear it!) Either way, this menu cures many headaches.
3. Turn off Microsoft ads
That segues neatly into the next tip. Keep scrolling down beyond the bottom of the list of apps that can send you notifications. There, you’ll see a couple of additional boxes that relate to Windows 11 itself providing “tips and suggestions” on how to use your PC. If you know your way around well enough, deselect the Offer suggestions on how I can set up my device and Get tips and suggestions when I use Windows boxes. I personally prefer to leave the Show me the Windows welcome experience… option checked so I’m notified of new features when a big update drops.
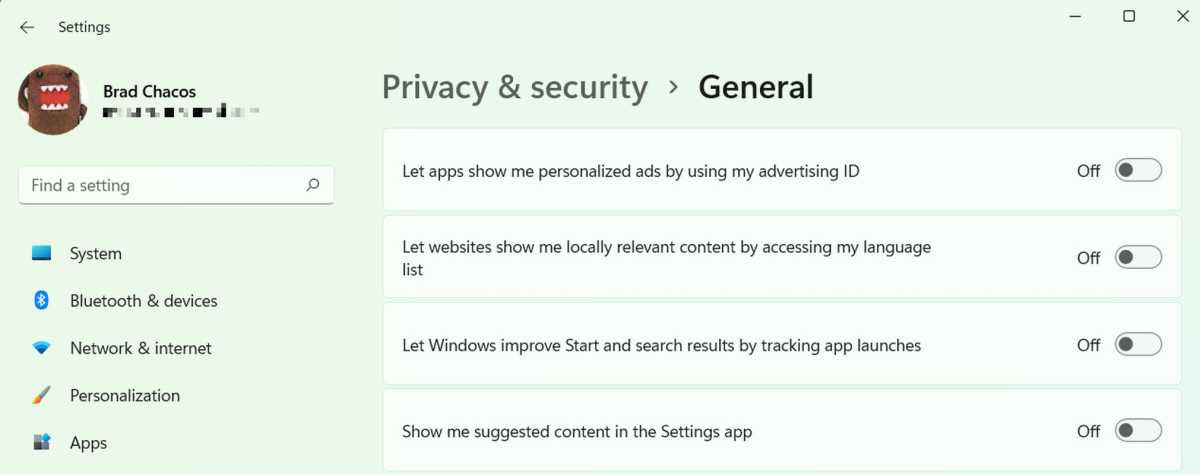
We’re not done yet, though. If you don’t like seeing Microsoft promotions (like Office and Xbox ads) pop up in your Settings app, head to Start > Settings > Privacy & security > General. Disabling “Show me suggested content in the Settings app” does the trick, though you may want to turn off all these options.
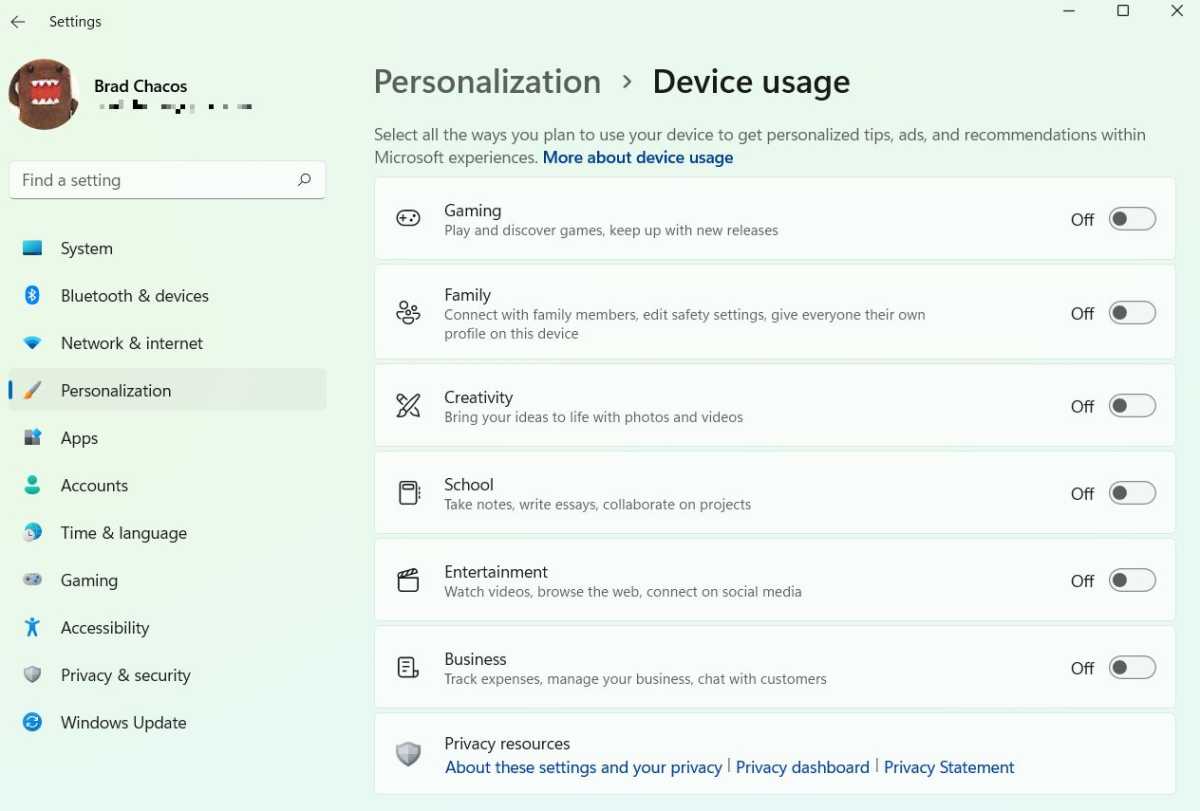
Finally, head to Settings > Personalization > Device Usage. The options here tell Microsoft how you use your computer so Windows 11 can provide tailored recommendations for apps, websites, Office 365 trials, and more. Turn them all off if you’re not interested in your $100+ copy of Windows 11 upselling you on more Microsoft services.
There are other places Microsoft promotions lurk such as the beautiful “Windows Spotlight” lock screens provided by Bing Images, but tweaking this handful of settings eradicates the most irritating ones.
4. Change your default browser
Microsoft Edge is pretty darned good, actually, but if you’re a diehard Chrome, Firefox, Opera, or Brave user, switching your default browser is easy.
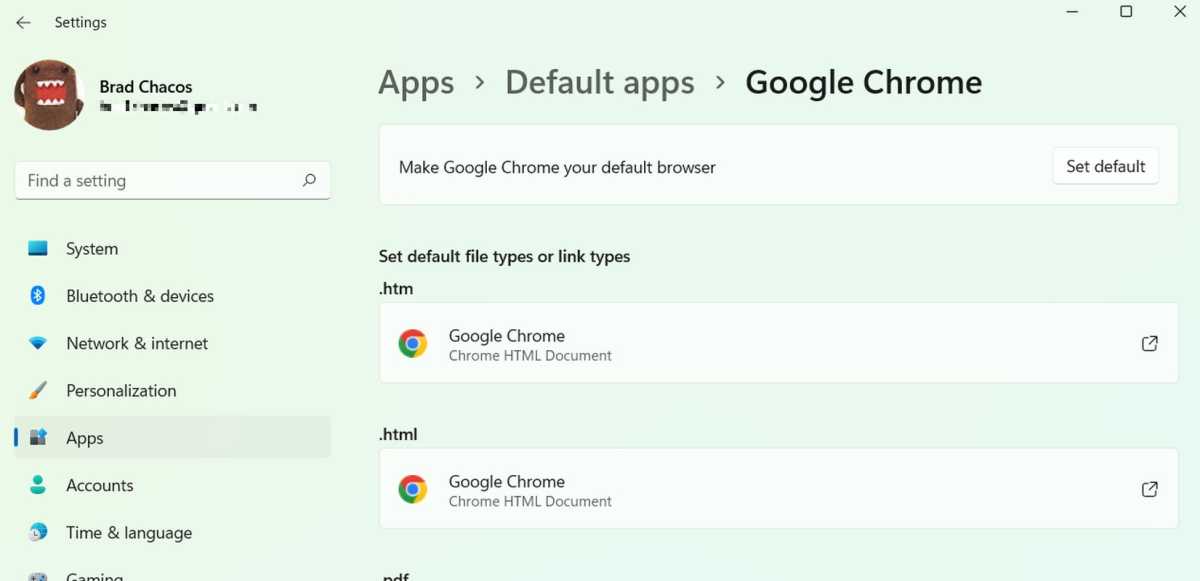
After downloading and installing the browser of your choice, it should ask if you want to make it the default. Do so, duh. But if you missed your chance during setup, navigate to Settings > Apps > Default apps, find the name of your browser in the list, and click on it. A “Make <browser name> your default browser” banner with a Set default button at the top of the page does the trick.
5. Declutter the taskbar
Sure, Windows 11’s nerfed taskbar is getting better over time, but it still sucks and Microsoft stuffs it to the brim with icons and features you probably have no interest in. Make it easier on the eyes and reclaim some space by heading to Settings > Personalization > Taskbar and deselecting any of the taskbar items you’ll never use. Adios, Widgets and Teams Chat.
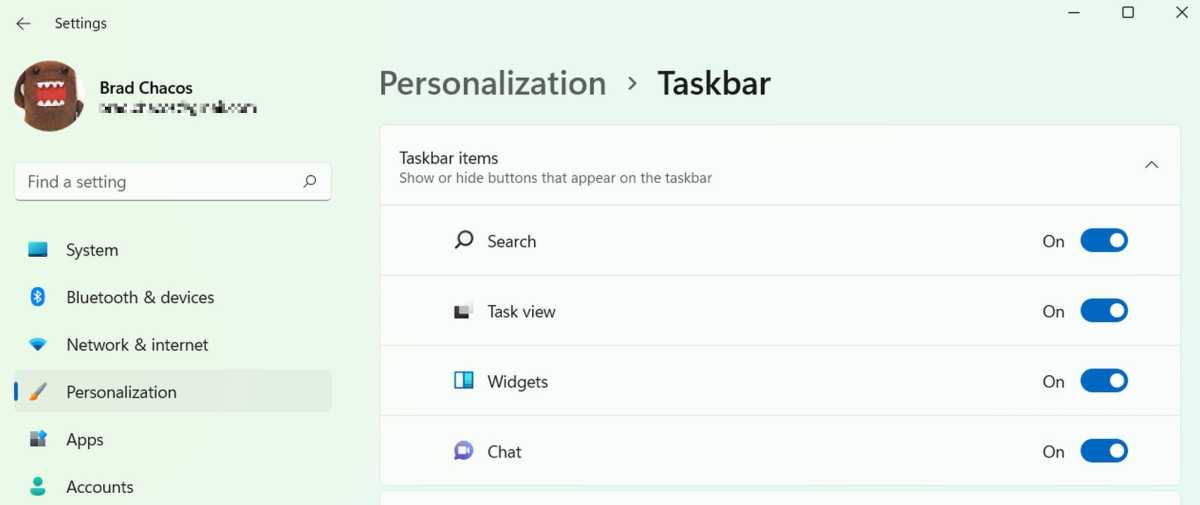
While we’re on the topic, spending $5 on Stardock’s Start11 or StartIsBack is well worth it. The programs offer granular options that expand the look and functionality of the taskbar and Start menu alike, making it a lot easier to make Windows 11 look like Windows 10. They’re beyond the scope of this article but deserve a shout-out.
Bonus: Dark mode, baby!
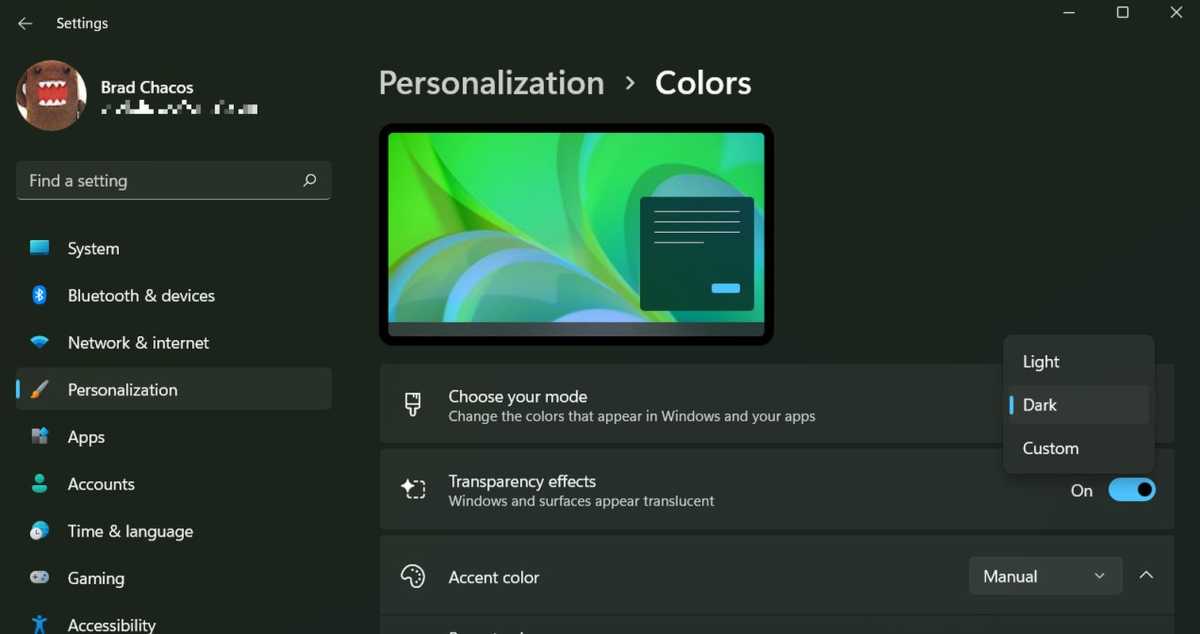
Finally, an optional personal preference. Some folks like staring at black text on white screens all day. Others, like me, prefer not to sear their retinas. So, the very first thing I always do with a new Windows install is activate dark mode, a preference that carries over into several apps once you’ve set it.
Brad Chacos/IDG
Simply head to Settings > Personalization > Colors and look for a field called Choose your mode. Change the drop-down menu from Light to Dark. Your eyes will thank you.
That’s about it for this rundown of quick Windows 11 settings to change immediately. This rabbit hole goes as deep as you want it, though. Check out our guides to 5 helpful tips and tricks that make Windows easier to use, 10 obscure Windows features that will blow your mind, and 7 frustrating Windows 11 annoyances (and how to fix them) to make your PC your own!

